
How to Use the CRM In Flow
📖 10 minute read
Flow's CRM is the central nervous system of your business. It's where every contact lives, every interaction is recorded, and every decision about follow-up is made. Unlike traditional CRMs that require IT expertise and expensive implementation, Flow's CRM works seamlessly with your forms, automations, and communications. Your contact data automatically updates in real-time as people interact with your business.
What Is a CRM and Why Does Flow Have One?
CRM stands for Customer Relationship Management. It's a centralised database of everyone who has interacted with your business: prospects, leads, customers, and contacts. Instead of contacts scattered across emails, spreadsheets, and sticky notes, a CRM keeps everything organised in one place.
Flow's CRM goes beyond storage. It's an intelligence system that:
- Tracks every interaction: Emails opened, links clicked, forms submitted, calls made
- Segments automatically: Tags organise contacts by behaviour, interest level, or stage in your funnel
- Integrates with all channels: Email, SMS, forms, and web interactions all update the same contact record
- Powers automations: Your automations read and write to the CRM in real-time
- Enables personalisation: Your messages reference contact history, past purchases, and preferences
- Provides insights: See which prospects are hot, which are cold, and which need attention
CRM Basics: Contacts and Data
Every person who interacts with your business becomes a contact in Flow's CRM. Each contact has:
Contact Profile
Basic information
- Name
- Email address
- Phone number
- Company
- Location
- Source (where they came from)
Contact History
Everything they've done
- Emails received and opened
- Links clicked
- Forms submitted
- Appointments booked/attended
- Calls made
- SMS sent and received
- Tags added/removed
This creates a complete picture of each contact. When you open a contact record, you see their entire journey with your business.
Accessing Your CRM
Step 1: Navigate to Contacts
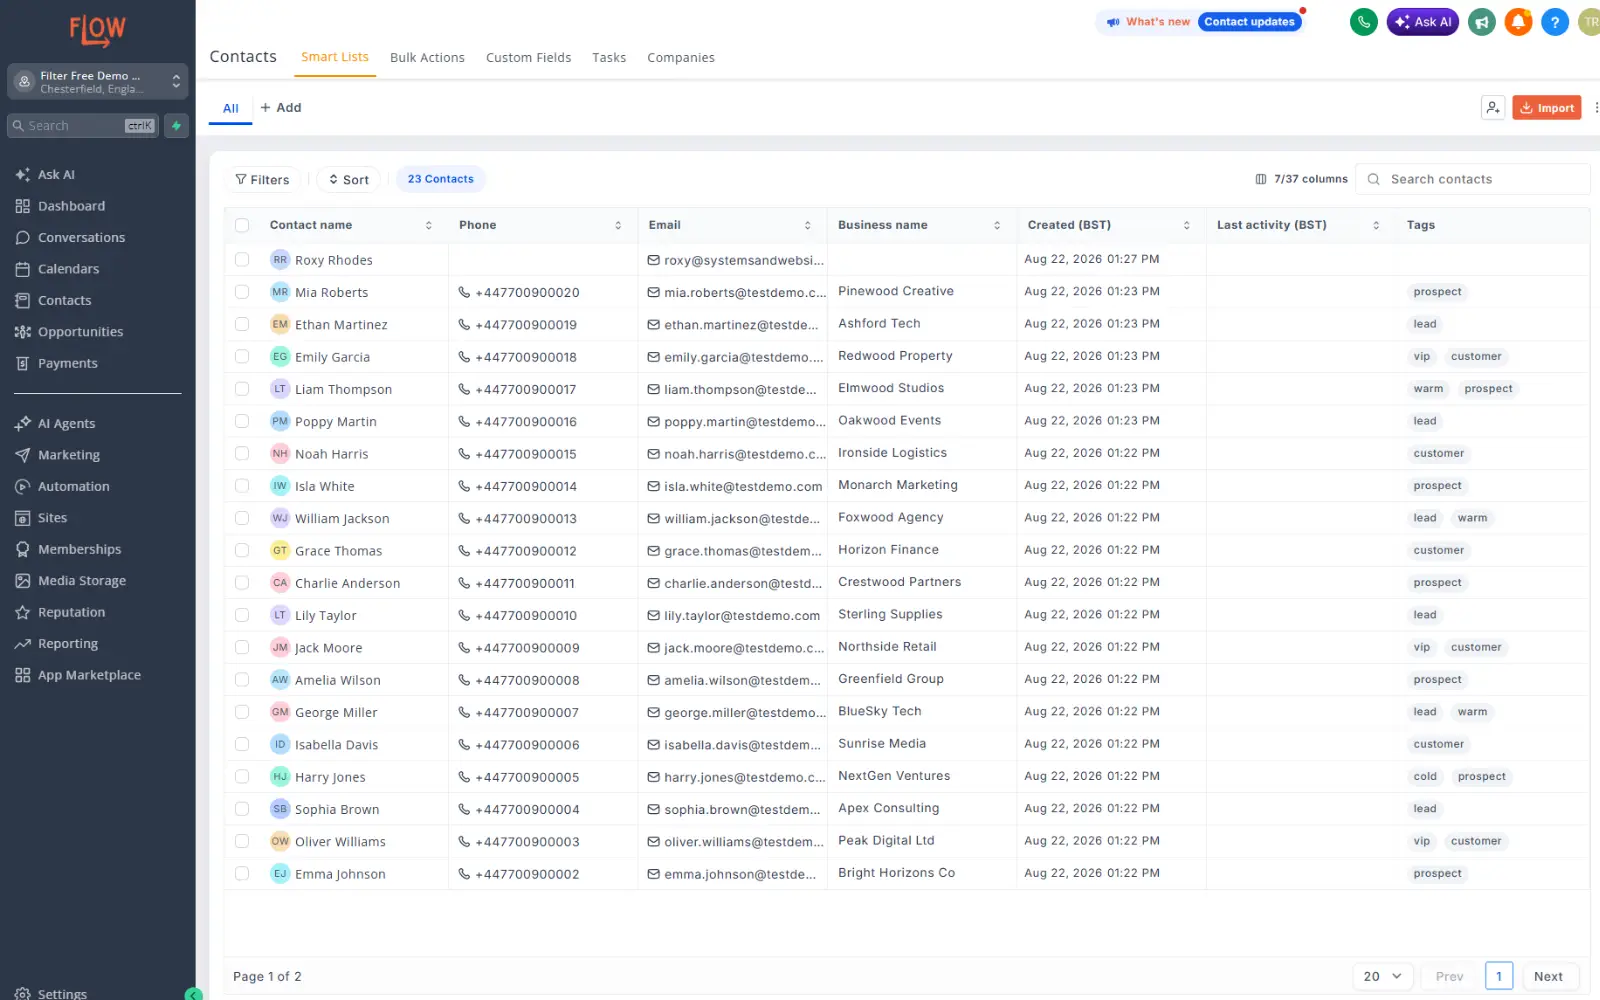
In your Flow dashboard, click Contacts on the left menu bar. This opens your contact list showing all contacts in your database.
Step 2: View the Contact List
You'll see a table with columns like Name, Email, Phone, Last Activity, and Tags. You can:
- Sort: Click column headers to sort by name, date added, last activity, etc.
- Filter: Use filters to show only contacts with specific tags, from specific sources, or with certain activity
- Search: Use the search bar to find a specific contact by name or email
Step 3: Open a Contact Record
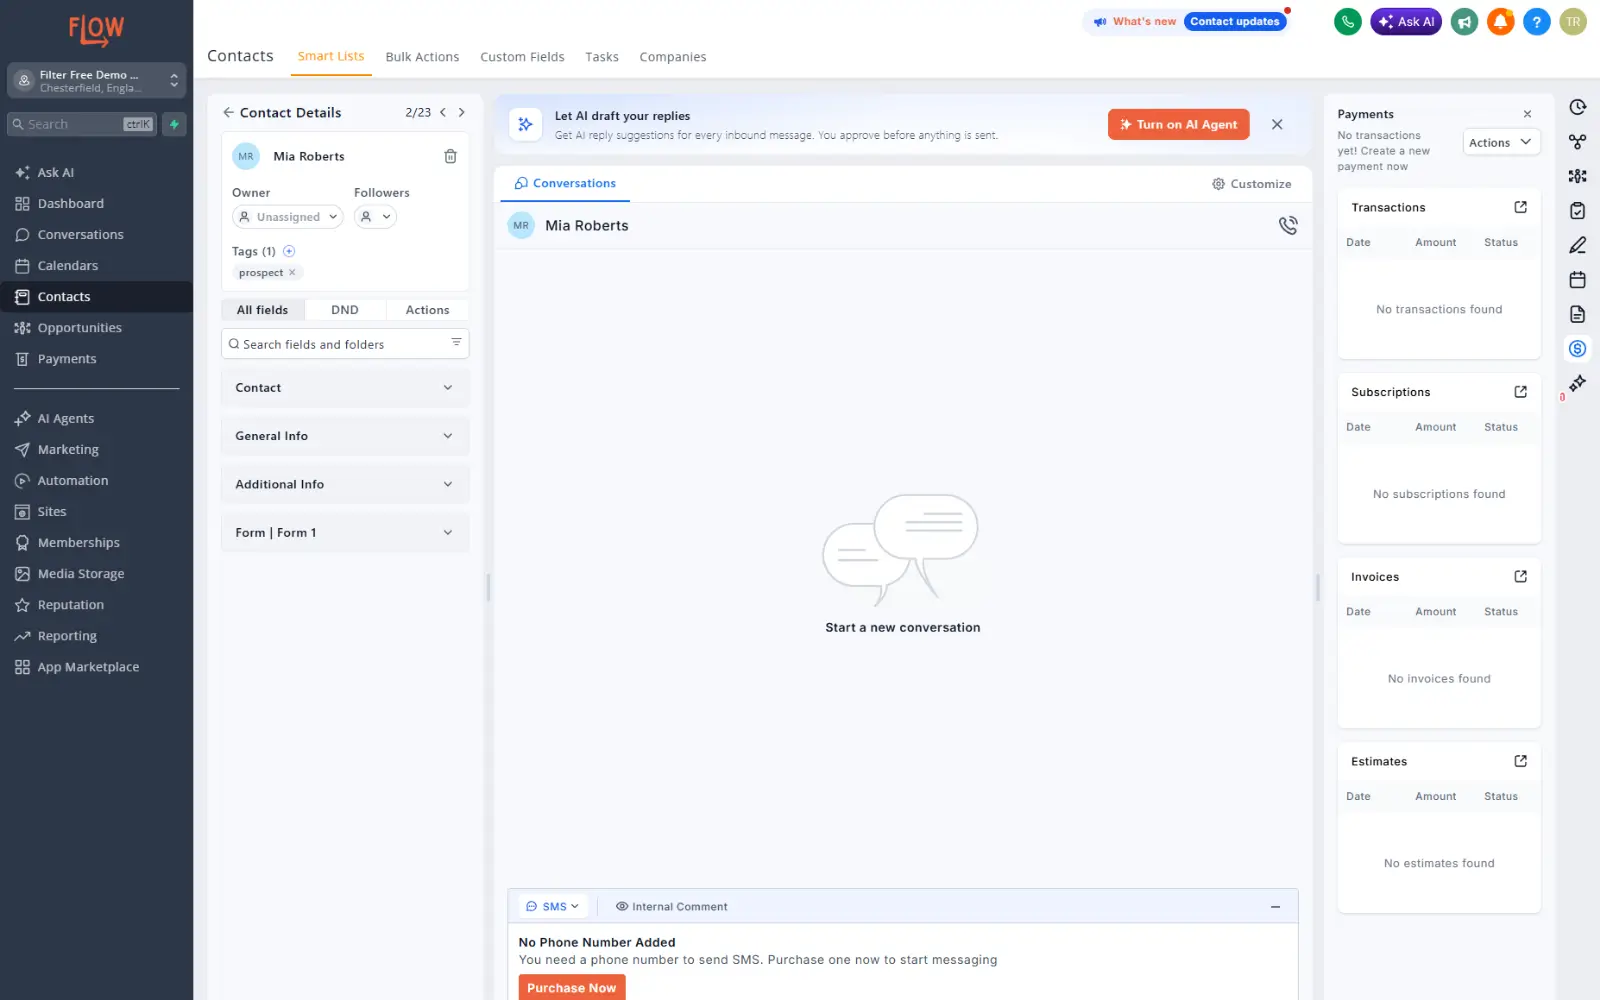
Click any contact name to open their full profile. Here you see:
- Conversations window with all of your messages to and from them, and an option to message them directly (middle of screen)
- All their information in an editable form (left of screen)
- Tags applied to them (left of screen)
- Complete interaction history and a timeline of everything they've done including forms filled in, emails opened, payments made etc. (right of screen icons)
Step 4: Add your branding
Match the form to your brand using the styles option in the top right of the screen:
- Change button colours and text
- Adjust field spacing and layout
- Add background colours or images
- Customise submit button messaging
All styling is done visually, no CSS required. Simply click elements and adjust them in the right panel.
Step 5: Settings & Notifications
Use the settings tab at the top of the page to set the success message or URL redirect when someone completes your form.
Use the notifications tab at the top of the page to send yourself emails whenever your form is completed, or set an auto response to clients.
Step 6: Publish & Integrate
Once your form is complete, click Save. You now have options for distribution:
- Embed on your website: Get the embed code and paste it into any web page
- Share a direct link: Get a URL for your form to send direct to customers
- Email: Send an email with the form to your clients
Click Integrate to access these options.
Uploading Contacts
Step 1: Access the Import Function
In your Contacts list, click the Import button (top right)
Step 2: Prepare Your File
Flow accepts CSV (comma-separated values) or Excel files. Your file needs column headers that match Flow's contact fields:
First NameorNameEmailPhoneCompanyCity,State,Postal Code- Any custom fields you've created
You don't need all fields, just the ones you have data for. Flow will match columns automatically.
Step 3: Upload and Map Fields
Click Upload File and select your CSV or Excel file. Flow will preview your data and ask you to confirm the column mapping. For example:
- Your "Customer Name" column → Flow's "First Name" field
- Your "Email Address" → Flow's "Email"
- Your "Mobile" → Flow's "Phone"
Review the mapping carefully to ensure data goes to the correct fields.
Step 4: Choose Duplicate Handling
If a contact already exists in your database (matching email), you can choose to:
- Skip: Don't import duplicates
- Update: Update existing contact with new data from your file
- Create new: Import everything as new contacts (may create duplicates)
Usually "Update" is safest because it refreshes existing records without creating duplicates.
Step 5: Auto-Tag on Import
You can automatically add tags to all imported contacts. For example, if uploading past customers, add the "Customer" tag to all of them at once. This helps you organise and segment your new contacts immediately.
Step 5: Confirm and Import
Review the summary (number of contacts, fields being imported, tags being applied), then click Confirm Import. Flow processes your file and adds contacts to your database.
Managing Tags and Segmentation
Tags
Tags are labels you assign to contacts to organise and segment them. Tags are fundamental to Flow because they trigger automations, segment audiences, and organise your thinking.
- Status tags: "Lead", "Customer", "Prospect", "Inactive"
- Interest tags: "Enterprise Plan", "Startup Plan", "Free Trial"
- Engagement tags: "Hot Lead", "Cold", "Engaged", "No-Show"
- Source tags: "Facebook Ad", "Google Search", "Referral", "Direct"
- Location tags: "London", "Manchester", "Scotland"
- Stage tags: "Qualified", "Demo Booked", "Proposal Sent", "Won"
How to Manually Tag a Contact
Open a contact record and look for the Tags field on the left. Click to add or remove tags. You can:
- Select existing tags from a dropdown
- Create new tags on the fly
- Add multiple tags to one contact
- Remove tags that no longer apply
Bulk Tagging
If you need to tag many contacts at once:
- Use the filter to show only contacts matching criteria (e.g., "contacts from Facebook")
- Select all filtered contacts (using the "Select All" checkbox)
- Click add tags at the top of the database
How Forms and Automations Update Contacts
This is where Flow's CRM becomes truly powerful: your contacts update automatically as they interact with your business.
Forms Automatically Create and Update Contacts
When someone submits a form in Flow:
- New contact created: If the email doesn't exist, Flow creates a new contact record
- Existing contact updated: If the email exists, Flow updates that contact's information
- Custom field populated: Form fields map to contact fields and custom fields automatically
- Form submission logged: The submission appears in the contact's history timeline
- Tags applied: If the form is set to auto-tag, tags are applied instantly
Form Submission Example
Scenario: Someone submits your "Demo Request" form with name, email, company, and budget
What happens automatically:
- Flow creates/updates contact with name and email
- Company field populated automatically
- Budget custom field populated
- "Demo Request" tag applied
- Timestamp recorded in contact history
- Automation triggering on form submission starts running
Result: No manual data entry needed. Contact record is immediately up to date and properly tagged.
Automations Update Contacts in Real-Time
Your automations don't just send messages, they also update contact data:
- Add/remove tags: Automation tags hot prospects, marks cold leads, or applies status tags
- Update custom fields: Automation updates lead score, next follow-up date, or status
- Create tasks: Automation creates a task for your team to follow up
- Record interactions: All emails, SMS, and calls sent by automations appear in contact history
💡 Pro Tip: Learn more about automations on the guide How to create automations in Flow
Email and Communication Tracking
Every email, SMS, or call through Flow is automatically tracked on the contact record:
- Email opened: Logged in contact timeline
- Link clicked: Recorded with timestamp
- Email bounced: Contact flagged, email marked invalid
- Reply received: Appears in contact history
Best Practices
- Keep Data Clean: Regularly review and correct contact information. Accurate data powers accurate automations and personalisation.
- Use Consistent Tags: Establish clear tagging rules so everyone on your team uses tags the same way.
- Segment Regularly: Don't just add contacts, actively manage them. Move people between status tags as they progress.
- Create Custom Fields Strategically: Only create fields you'll actually use. Too many fields clutter records and confuse your team.
- Link Forms to Campaigns: Configure forms to auto-tag and trigger specific automations so data flows correctly.
- Use the Contact Timeline: Review the timeline when preparing to contact someone. Know what you've sent them and how they've engaged.
- Set Contact Preferences: Allow contacts to manage communication preferences. Respect do-not-contact requests.
- Review CRM Reports: Regularly check reports on contact growth, engagement, and conversion to understand what's working.
Common Mistakes to Avoid
- Duplicate Contacts: Importing without checking for duplicates creates messy data. Always use "Update" mode when importing existing contacts.
- Over-Tagging: Adding too many tags per contact makes reporting and segmentation confusing. Keep it to 3-5 relevant tags per person.
- Not Using Custom Fields: Relying only on basic fields means you miss insights. Use custom fields to track what matters to your business.
- Broken Form Mapping: If forms aren't mapping correctly to contact fields, your CRM becomes unreliable. Test forms thoroughly after creating them.
- Ignoring Contact Preferences: If you ignore someone's "Do Not Contact" preference or email them after they unsubscribed, you damage your reputation and violate regulations.
- Manual Data Entry: Typing contact data manually defeats the purpose of a CRM. Always use forms or imports to capture data automatically.
- No Segmentation Strategy: Having thousands of contacts with no tags or organisation makes your database useless. Plan your tagging strategy before you start.
- Forgetting to Update Contacts: If someone's status changes (they become a customer, they go cold), update their tags and move them to the correct automations.
Your CRM Is Your Business Foundation
- Duplicate Contacts: Importing without checking for duplicates creates messy data. Always use "Update" mode when importing existing contacts.
- Over-Tagging: Adding too many tags per contact makes reporting and segmentation confusing. Keep it to 3-5 relevant tags per person.
- Not Using Custom Fields: Relying only on basic fields means you miss insights. Use custom fields to track what matters to your business.
- Broken Form Mapping: If forms aren't mapping correctly to contact fields, your CRM becomes unreliable. Test forms thoroughly after creating them.
- Ignoring Contact Preferences: If you ignore someone's "Do Not Contact" preference or email them after they unsubscribed, you damage your reputation and violate regulations.
- Manual Data Entry: Typing contact data manually defeats the purpose of a CRM. Always use forms or imports to capture data automatically.
- No Segmentation Strategy: Having thousands of contacts with no tags or organisation makes your database useless. Plan your tagging strategy before you start.
- Forgetting to Update Contacts: If someone's status changes (they become a customer, they go cold), update their tags and move them to the correct automations.