
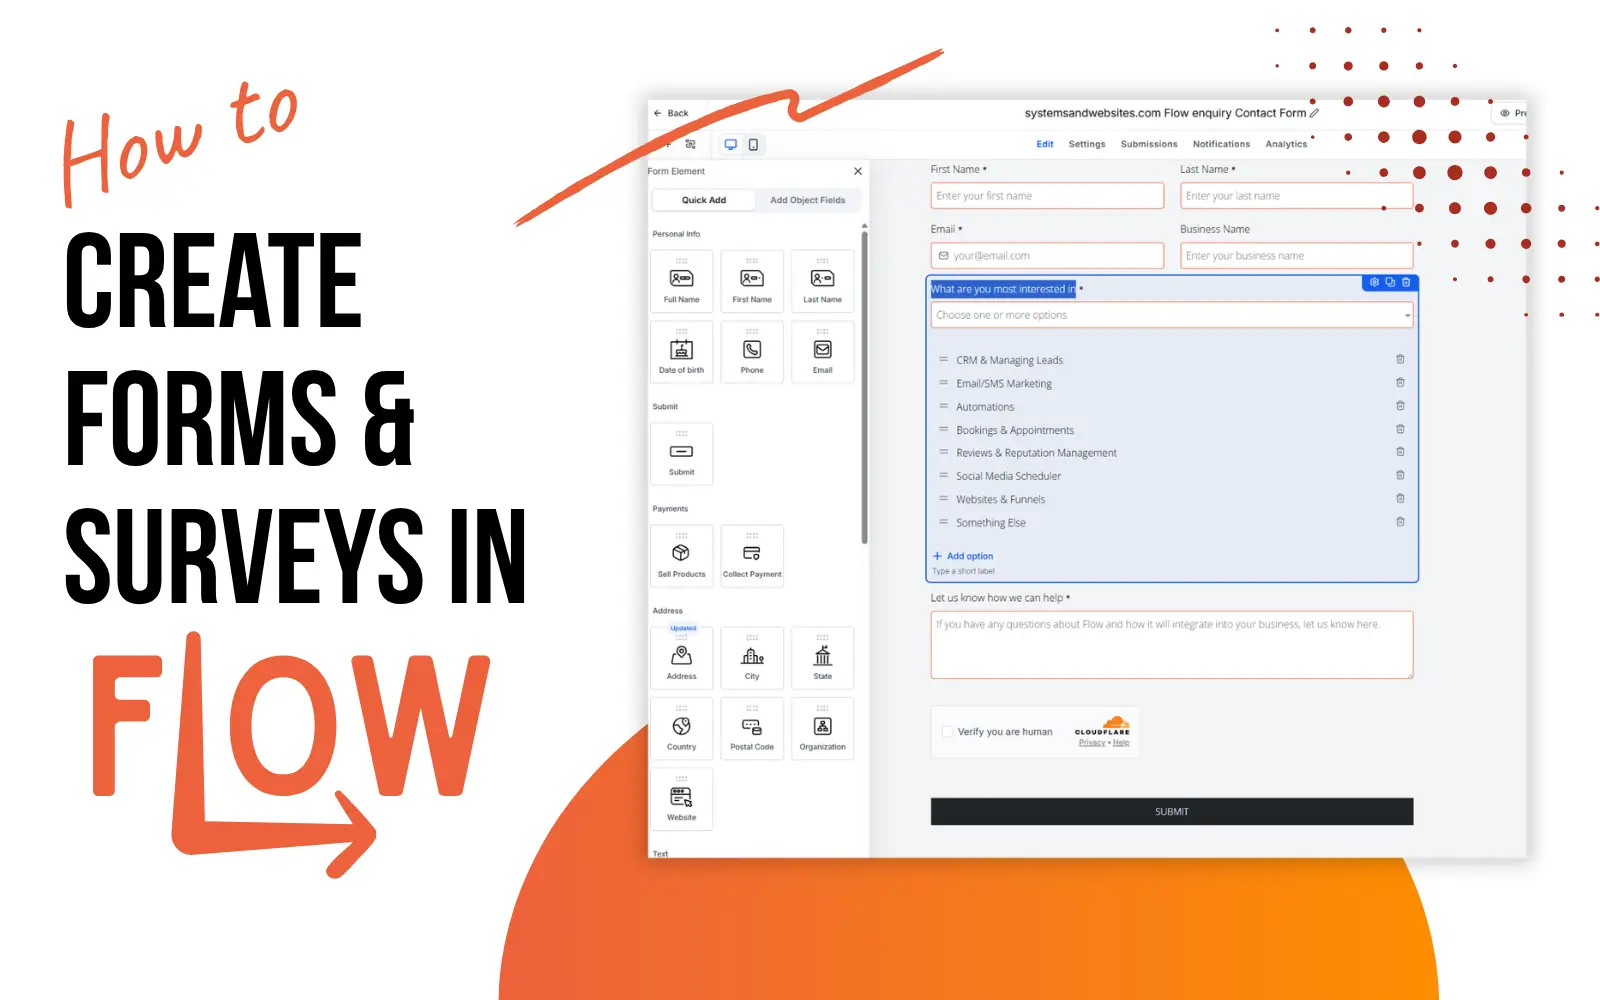
How to create forms & Surveys in Flow
📖 12 minute read
Whether you want to collect new enquiries, qualify potential customers, gather feedback or learn more about your audience, forms and surveys can make the process quicker, easier and far more organised.
With Flow, you can create forms and surveys that collect information directly from your customers and automatically store it against their contact record. Better still, you can use automations to take action based on the answers they provide.
In this guide, we’ll look at the difference between forms and surveys, when to use each one, and how you can use them to save time and improve your customer experience.
Forms vs. Surveys: What’s the Difference?
Although forms and surveys can look similar, they are generally used for different purposes.
Forms
Forms are designed to collect information from a customer or potential customer.
For example, you might use a form for:
- Website contact enquiries
- Quote requests
- Booking requests
- New customer onboarding
- Event registrations
- Lead generation
- Job applications
- Collecting customer details
A form is usually focused on getting the information you need in order to take the next step.
Surveys
Surveys are generally better suited to asking questions and collecting opinions, feedback or responses.
You could use surveys to:
- Collect customer feedback
- Measure customer satisfaction
- Carry out market research
- Find out which services customers are interested in
- Gather feedback after an event
- Ask customers about their experience
- Create questionnaires or assessments
For example, after completing a project, you could send a customer a survey asking:
How satisfied were you with the service?
Followed by questions about communication, value for money and whether they would recommend your business.
The answers can then be stored against their contact record, giving you a clearer picture of your customers and their experience with your business.
Creating Your First Form
Step 1: Decide What Information You Actually Need
Before building your form, think carefully about what information is genuinely useful.
One of the biggest mistakes businesses make is creating forms with too many questions.
If someone visits your website and is faced with a 20-question contact form, they may simply decide not to complete it.
Try to keep the form as simple as possible.
For a basic enquiry form, you might only need:
Name
Email address
Phone number
What can we help you with?
You can always collect additional information later.
The easier your form is to complete, the more likely people are to submit it.
Step 2: Access the forms Builder
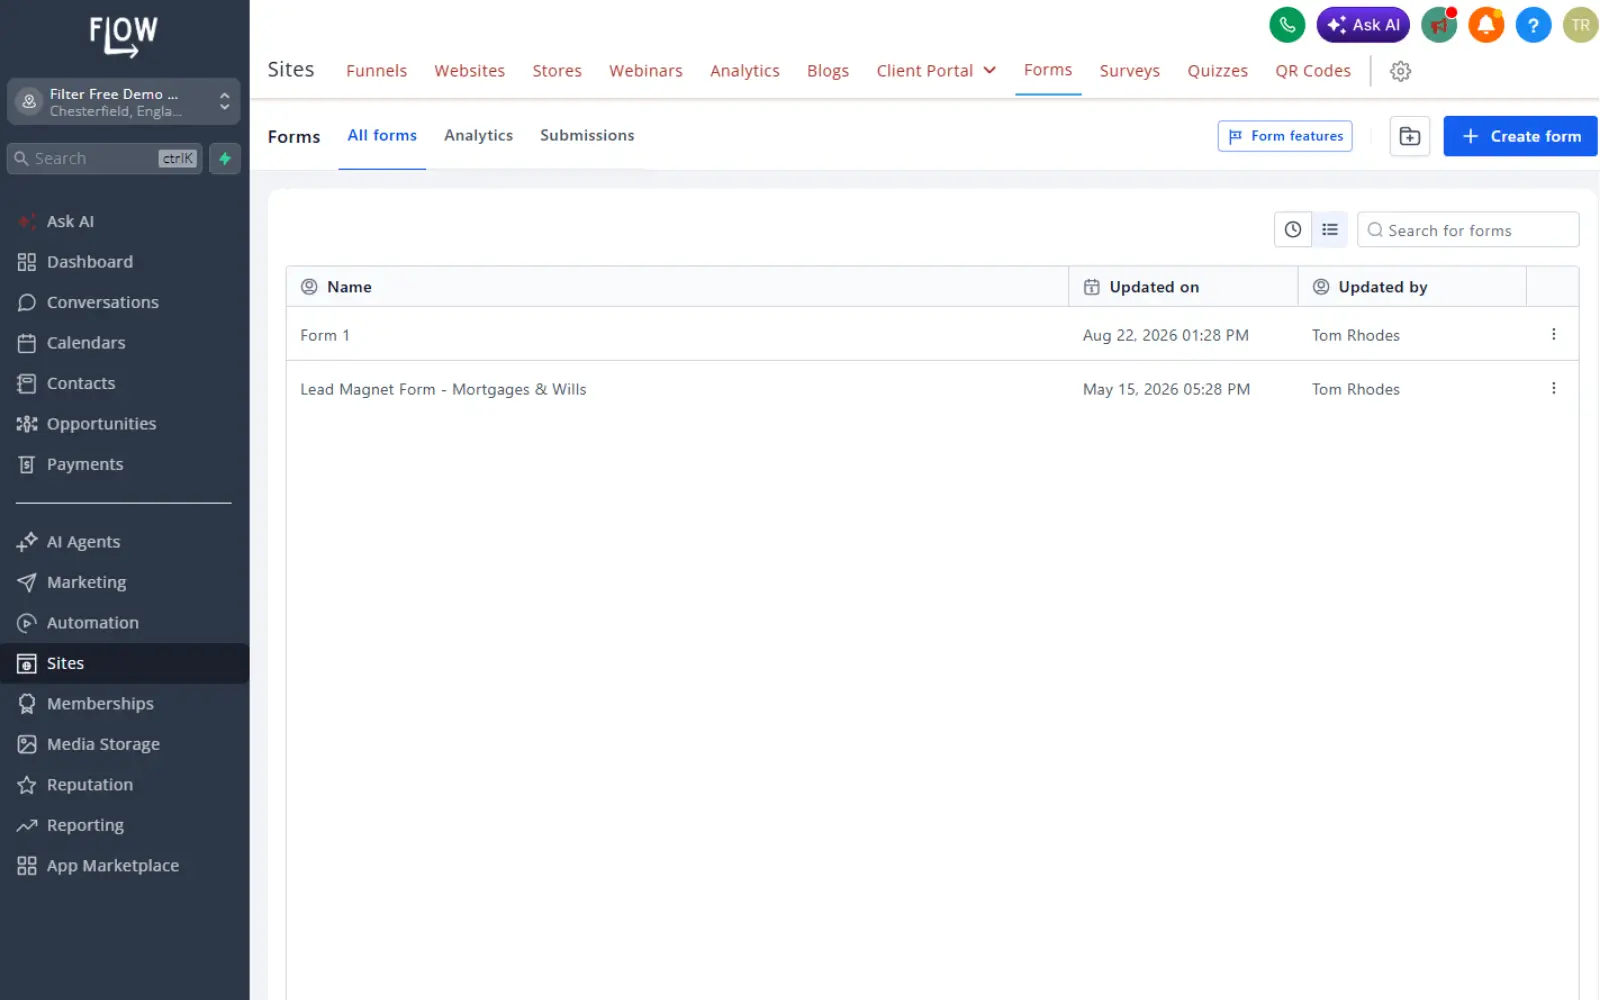
In your Flow dashboard, navigate to Sites → Forms. Click the Create Form button in the top right corner. Choose to either start from scratch or use one of the pre-built templates.
Step 3: Add form fields
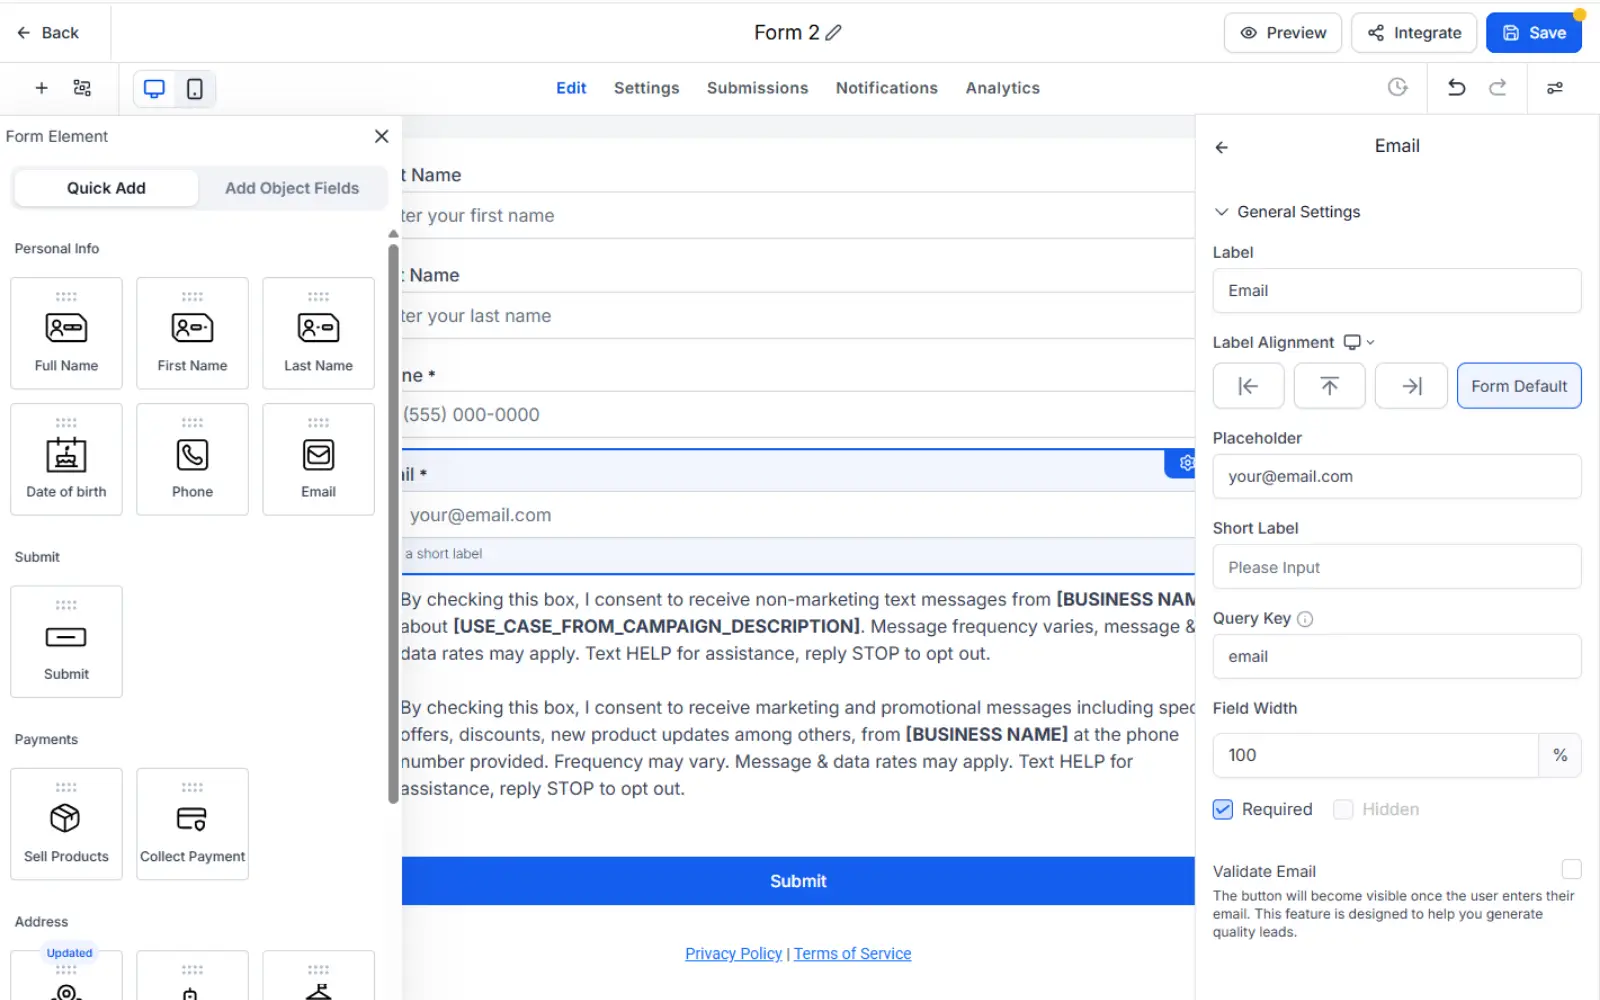
The drag-and-drop builder makes field addition simple. Common fields include:
- Text input (name, company, etc.)
- Phone number
- Dropdown menus
- Checkboxes and radio buttons
- Date pickers
- Text area for longer responses
- Custom fields (mapped to your CRM)
All of these fields will automatically add the details to your contact in your CRM when they fill the form in. It’s important you collect their email address as part of the form to link this.
Click and drag fields from the left into your form. Each field can be customised from the right-side panel: set labels, placeholder text, required/optional status, and more.
💡 Pro Tip: Add Custom Fields unique to your business
Use Text and Choice elements in your form to collect information that is specific to your business.
For example, a wedding venue might want to collect:
- Preferred wedding date
- Number of guests
- Type of wedding
- Estimated budget
Once created, these custom fields can be reused throughout your Flow account and on other forms & surveys by clicking Add Object Fields and dragging the field onto a new form.
The information can also be used in automations, emails, pipelines and other areas of the system.
Step 4: Add your branding
Match the form to your brand using the styles option in the top right of the screen:
- Change button colours and text
- Adjust field spacing and layout
- Add background colours or images
- Customise submit button messaging
All styling is done visually, no CSS required. Simply click elements and adjust them in the right panel.
Step 5: Settings & Notifications
Use the settings tab at the top of the page to set the success message or URL redirect when someone completes your form.
Use the notifications tab at the top of the page to send yourself emails whenever your form is completed, or set an auto response to clients.
Step 6: Publish & Integrate
Once your form is complete, click Save. You now have options for distribution:
- Embed on your website: Get the embed code and paste it into any web page
- Share a direct link: Get a URL for your form to send direct to customers
- Email: Send an email with the form to your clients
Click Integrate to access these options.
Creating Multi Step Surveys
Surveys can be used to better understand your customers and collect valuable feedback.
Rather than guessing what your customers think, you can ask them directly.
Customer Feedback Surveys
One of the simplest uses of a survey is asking customers about their experience.
You could send a survey after:
Completing a project
Attending an event
Purchasing a product
Completing a course
Having an appointment with you
Your survey could include questions such as:
How would you rate your overall experience?
What did you like most?
Was there anything we could improve?
How likely are you to recommend us to someone else?
The answers can help you identify both strengths and areas for improvement.
Step 1: Access the Surveys Builder
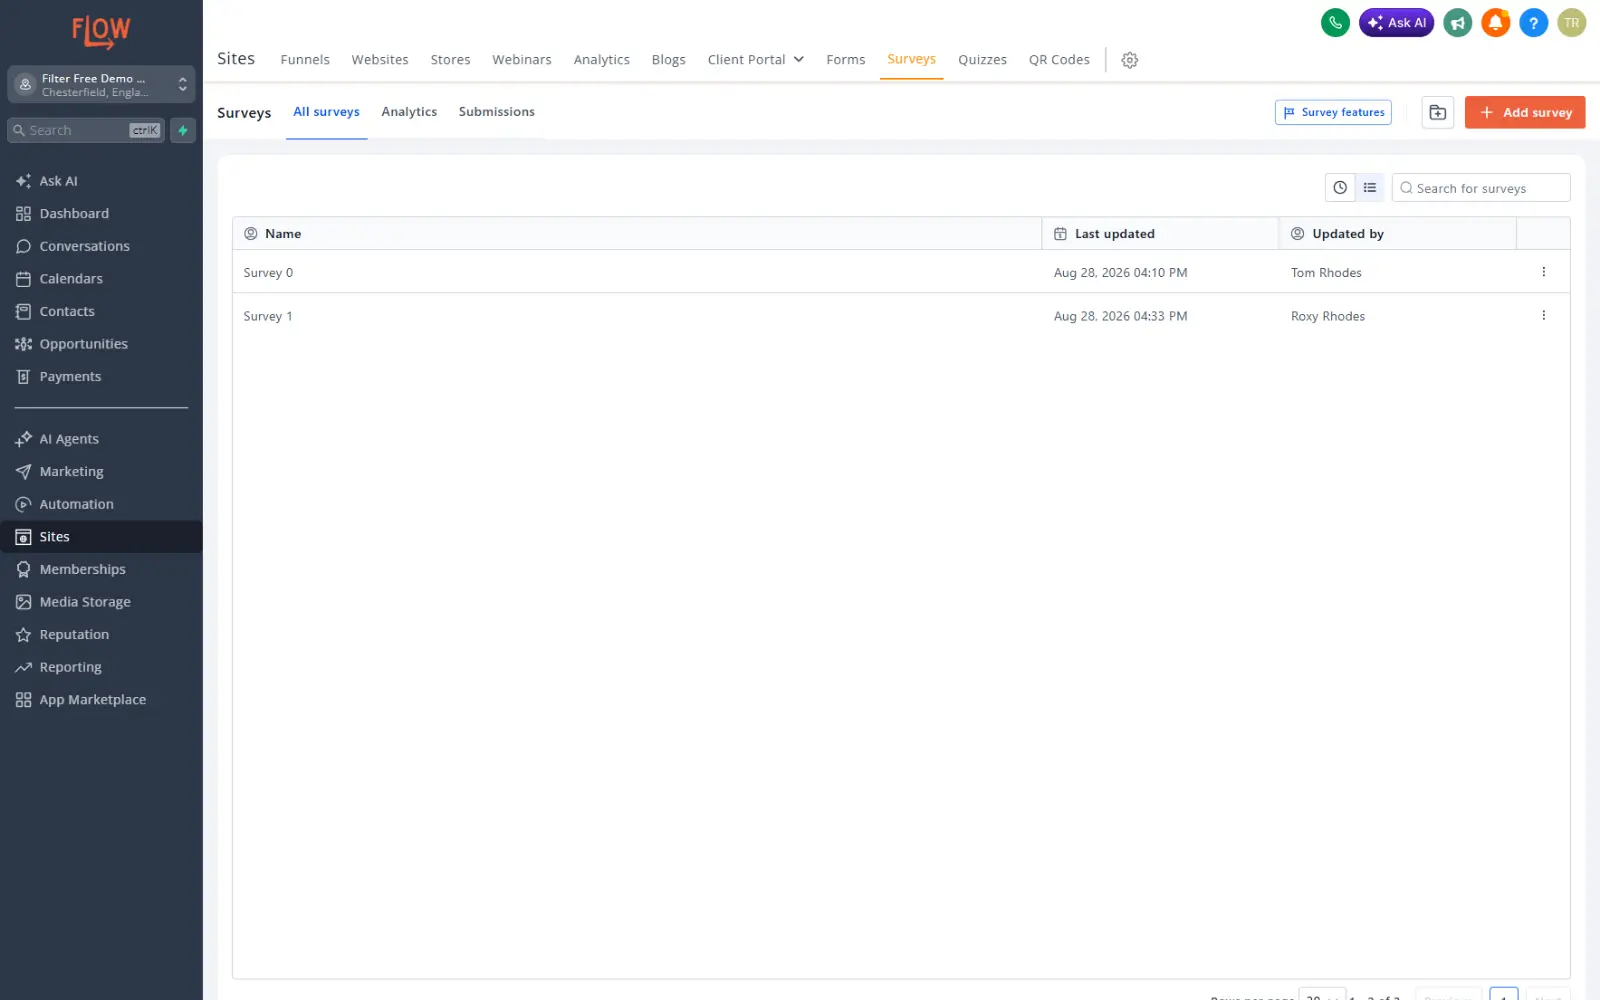
In your Flow dashboard, navigate to Sites → Surveys. Click the Create Survey button in the top right corner. Choose to either start from scratch or use one of the pre-built templates.
Step 2: Add Survey Fields
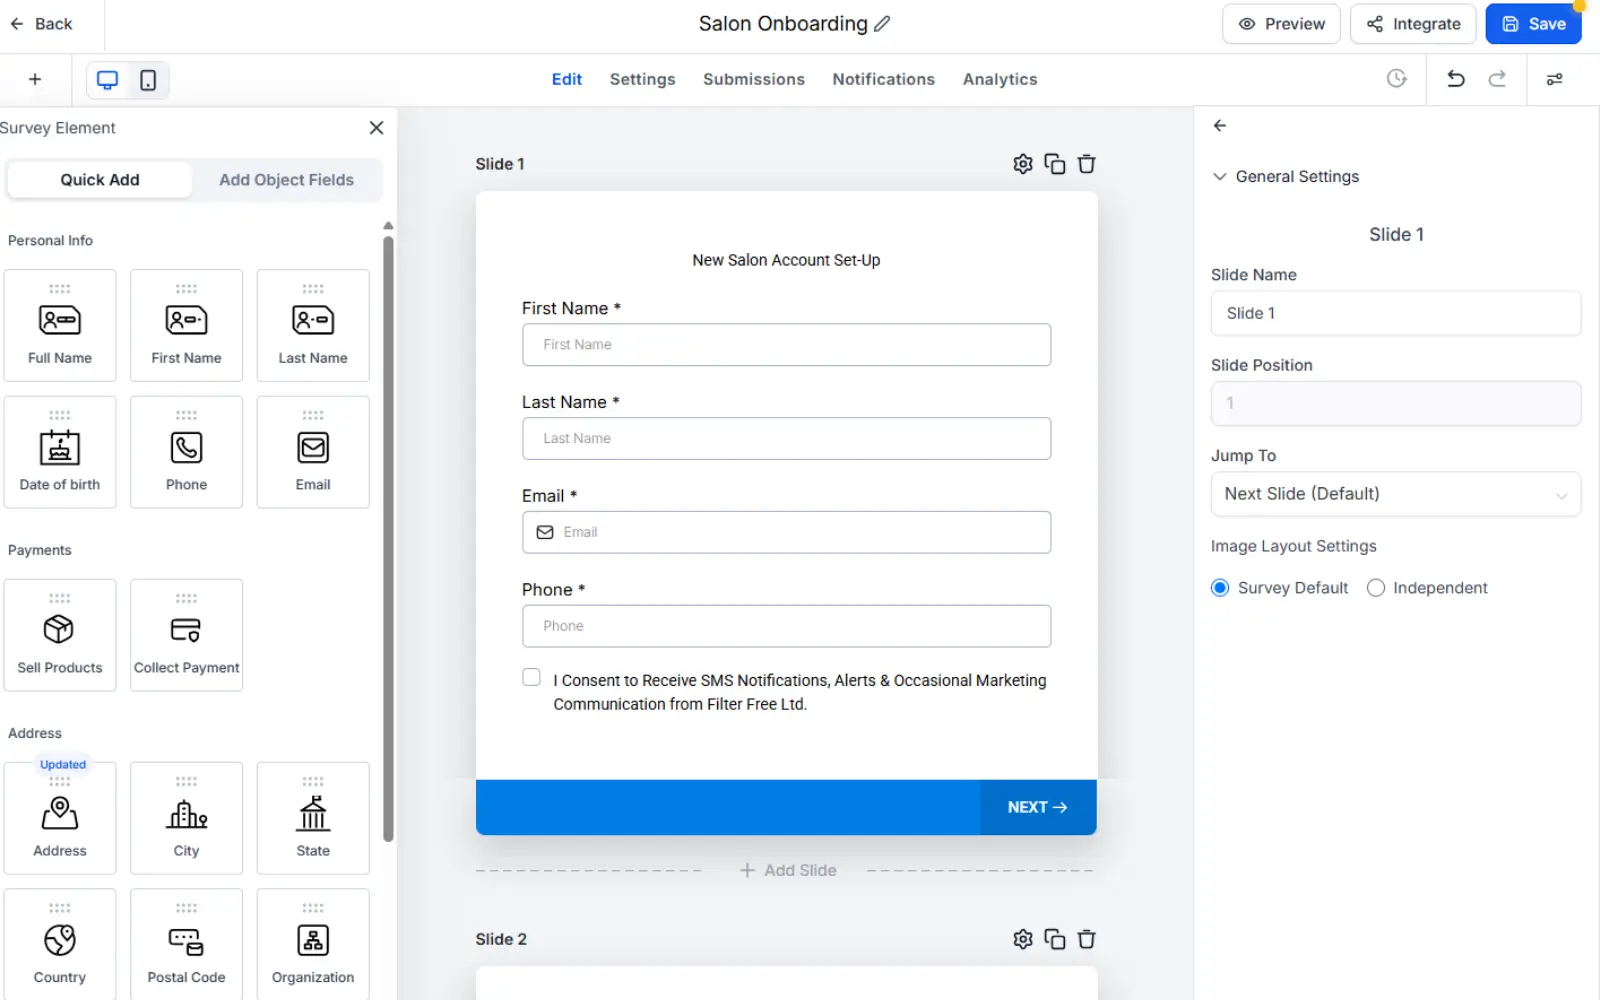
As with forms, drag and drop survey fields from the elements tab on the left of the screen. You can have one or multiple fields per slide.
Choose from pre-set fields such as Names, Email, Phone Number, or create your own fields with Text, Checkboxes, Dates and more.
Click the + Add Slide button at the bottom of the screen to make multiple slides, splitting your survey up into manageable chunks.
All of these fields will automatically add the details to your contact in your CRM when they fill the form in. It’s important you collect their email address as part of the form to link this.
Dont forget to save your progress using the button in the top right of your screen.
Step 3: Add your branding
Match the survey to your brand using the styles option in the top right of the screen:
- Change button colours and text
- Adjust field spacing and layout
- Add background colours or images
- Customise submit button messaging
All styling is done visually, no CSS required. Simply click elements and adjust them in the right panel.
Step 4: Settings & Notifications
Use the settings tab at the top of the page to set the success message or URL redirect when someone completes your survey.
Use the notifications tab at the top of the page to send yourself emails whenever your survey is completed, or set an auto response to clients.
Step 5: Publish & Integrate
Once your survey is complete, click Save. You now have options for distribution:
- Embed on your website: Get the embed code and paste it into any web page
- Share a direct link: Get a URL for your form to send direct to customers
- Email: Send an email with the form to your clients
Click Integrate to access these options.
Advanced Features
Custom Fields
Create your own fields by selecting various fields such as text and choice. You can define the question and answer choices and these will be stored against the contact that completes them in your CRM.
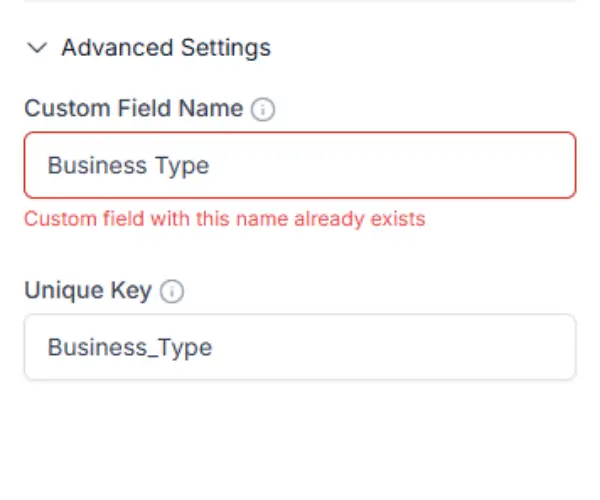
WARNING: Be careful when repeating questions on multiple forms. Each question must have it's own unique key or it will not allow you to save the form. You can choose one of your pre-created questions using the Add Object Field button on your Add Elements tab to repeat it across multiple forms.
Using Conditional Questions
Conditional Logic lets your form or survey change based on how someone answers a question. Instead of everyone seeing the same thing, you can show or hide certain fields, skip to a different slide, redirect them to a specific page, show a custom message, or disqualify them as a lead, all depending on their response.
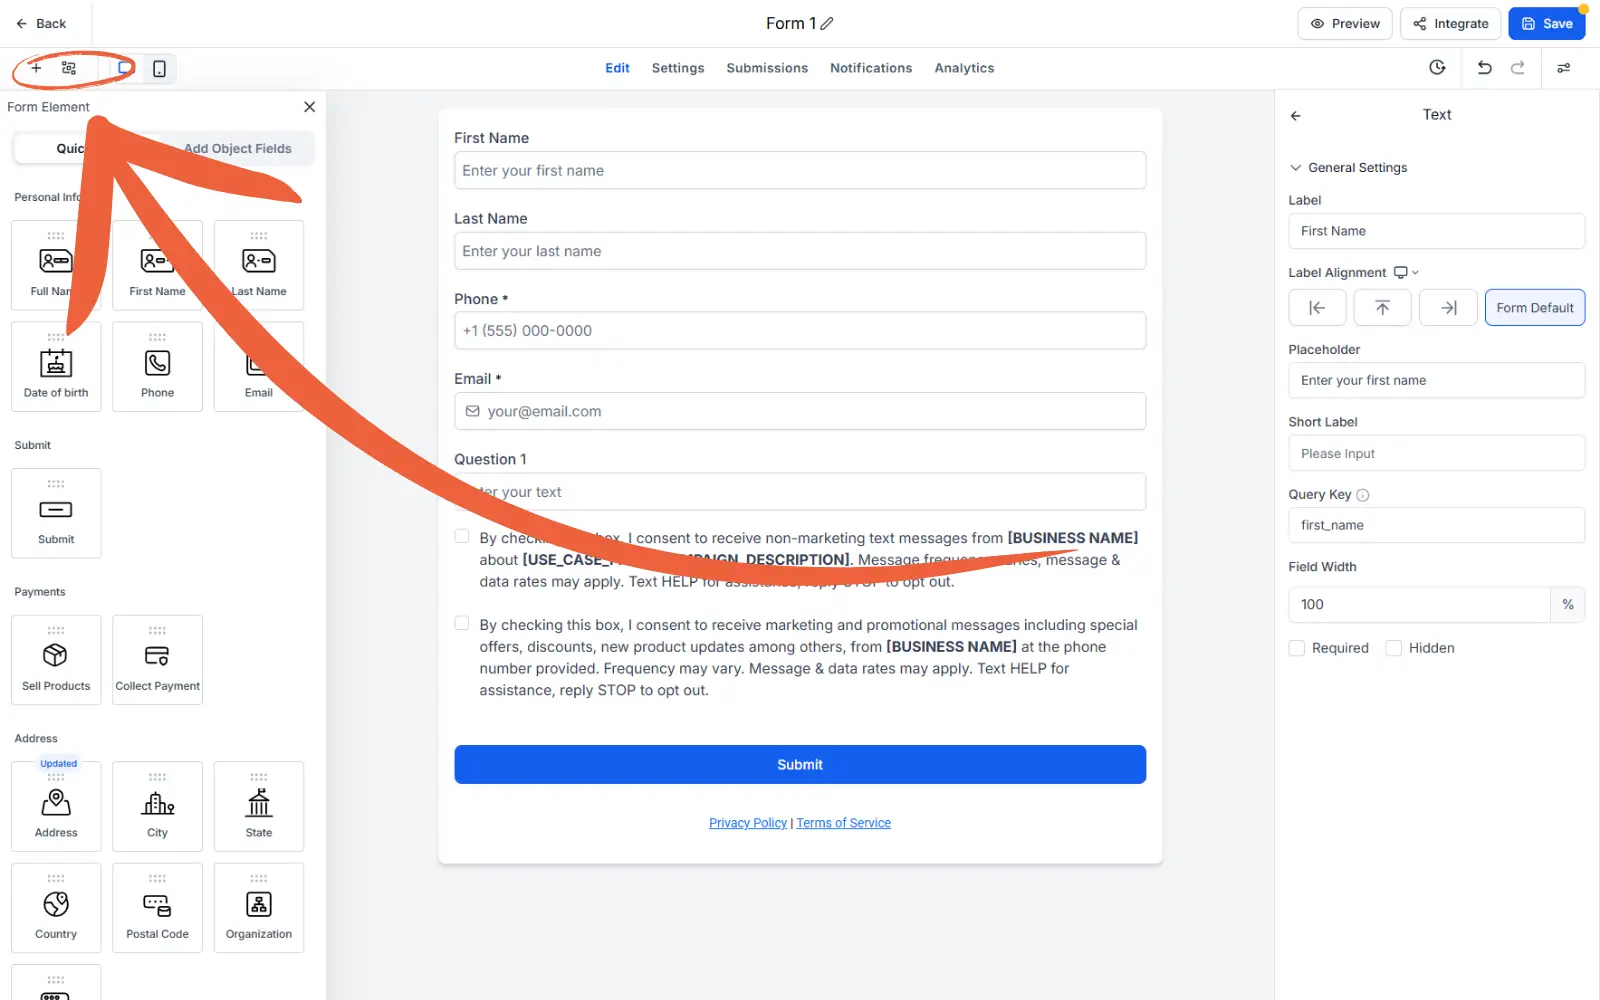
After you have created your fields in your form/survey, select the conditional logic button at the top left of the screeen to start setting rules.
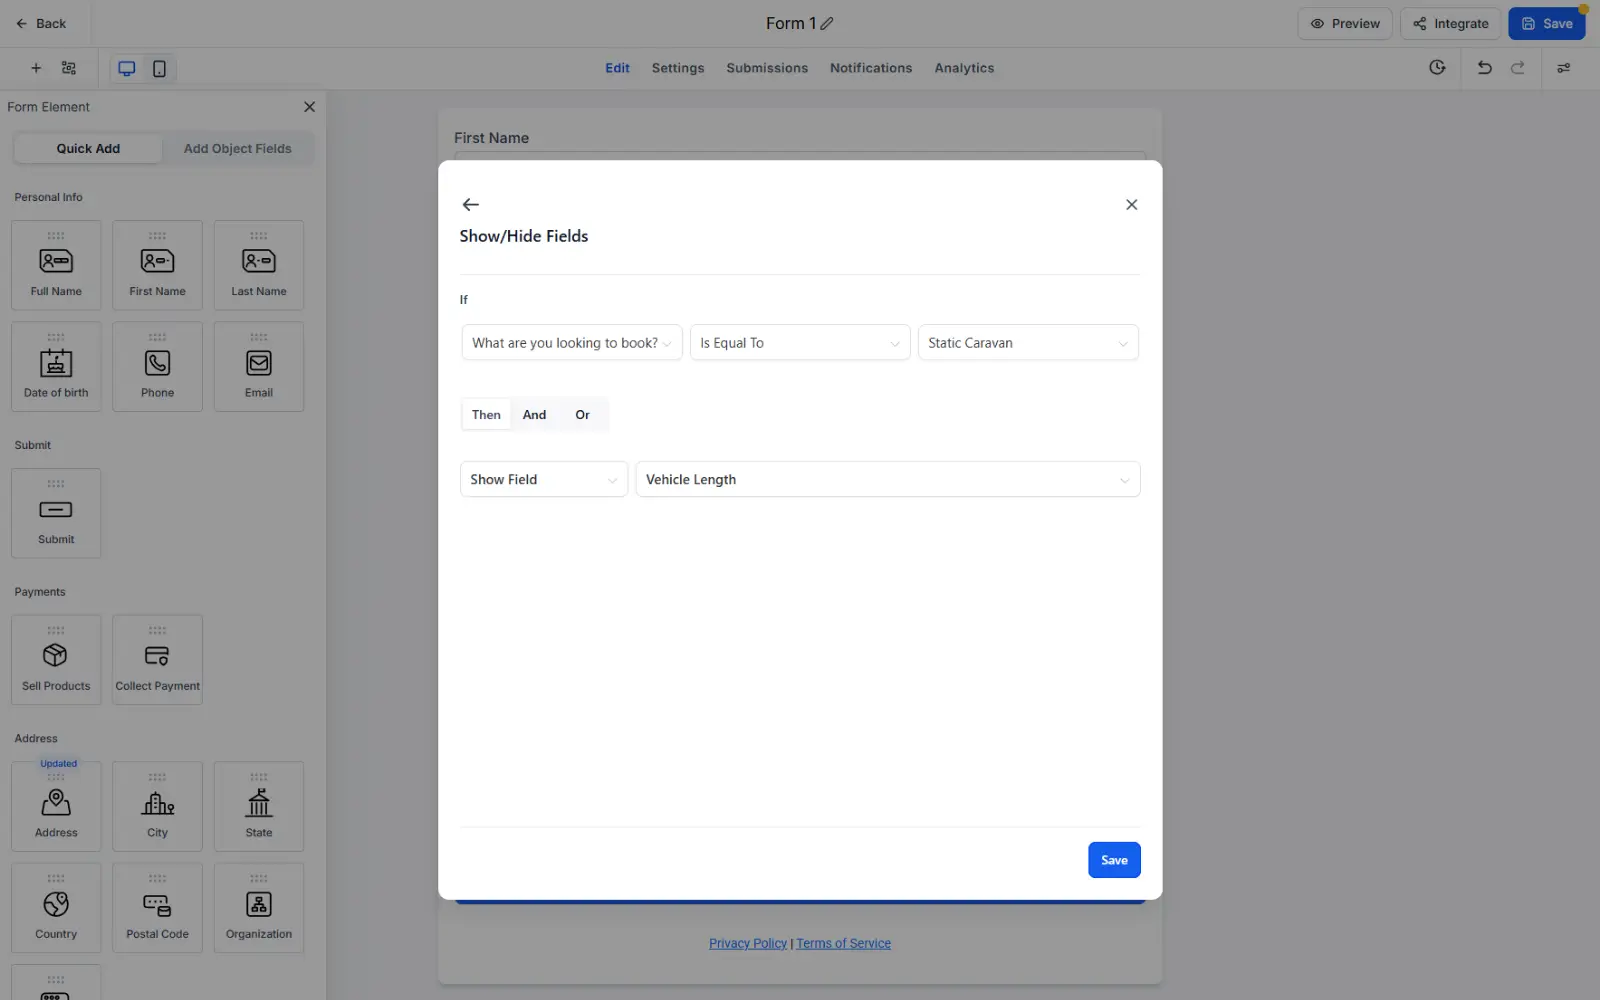
To set up a rule, pick your condition e.g. Show/Hide Field, then set your rules based on IF _____ THEN _____.
For example, a caravan park's booking enquiry form could contain the question: "What are you looking to book?" with options like static caravan, touring pitch, or camping.
IF someone picks "touring pitch," THEN the you can make fields visible for vehicle length and whether they need an electric hook-up. IF they pick "camping," THEN the form shows fields for number of tents.
If you have more than one rule, they run in order from top to bottom.
Link To Automations
Forms are most powerful when linked to the automations feature in your Flow account.
When someone submits a form, that submission can automatically trigger a workflow, which is a series of actions that fire without anyone lifting a finger. In Flow this is done with a "Form Submitted" trigger: as soon as a contact fills in the form, they're enrolled into whatever automation you've built around that trigger.
From there, the workflow can do things like send an instant confirmation text or email, notify a staff member internally, add a tag to the contact so you know where they came from, update custom fields with what they entered, or drop them into a specific stage of your sales pipeline. You can also add waits and branches, so the automation checks whether someone's replied and does something different depending on the answer.
Analytics and submissions
Flow gives you two main ways to see how your forms and surveys are performing: an analytics tab and a submissions tab. Both are located at the top of each form.
The analytics tab shows the bigger picture, things like total views, how many people actually submitted, your completion rate, and the average time it takes someone to fill the form in. For surveys, it also shows drop-off rates per slide, so you can see exactly where people are giving up partway through. All of this can be filtered by date range (last 7, 14, 30, 60, or 90 days, or a custom period) and by individual form or survey, with graphs to make trends easy to spot.
The submissions tab is where you see the actual responses people have given, laid out in a table you can customise, showing whichever fields matter most to you, in whichever order you like. You can click into any single submission to see the full response, download it as a PDF, or select several at once to export as a CSV or delete them. There's also quick access to copy a contact's phone number or email straight from the table.
Together, the two give you both the overview and the detail: the analytics tab tells you whether your form is working (are people finishing it, where are they dropping off), while the submissions tab lets you actually dig into what people said and do something with it.
Common Mistakes to Avoid
- Too many fields: Every extra field reduces completion rates. Keep forms to 5-7 fields maximum.
- No clear purpose: Tell respondents why you're asking for information. A short intro line improves trust.
- Ignoring mobile: Always preview your form on mobile devices. Half your submissions likely come from phones.
- Forgetting automations: A form is incomplete without follow-up workflows. Set these up immediately after publishing.
- Repeated custom field names: Each field needs it's own unique field name to identify it. To re-use a field you have created before, find it in the Add Object Fields tab rather than recreating it.
- Changing query keys: If your workflows already reference old query keys, changing them breaks automation. Edit carefully.