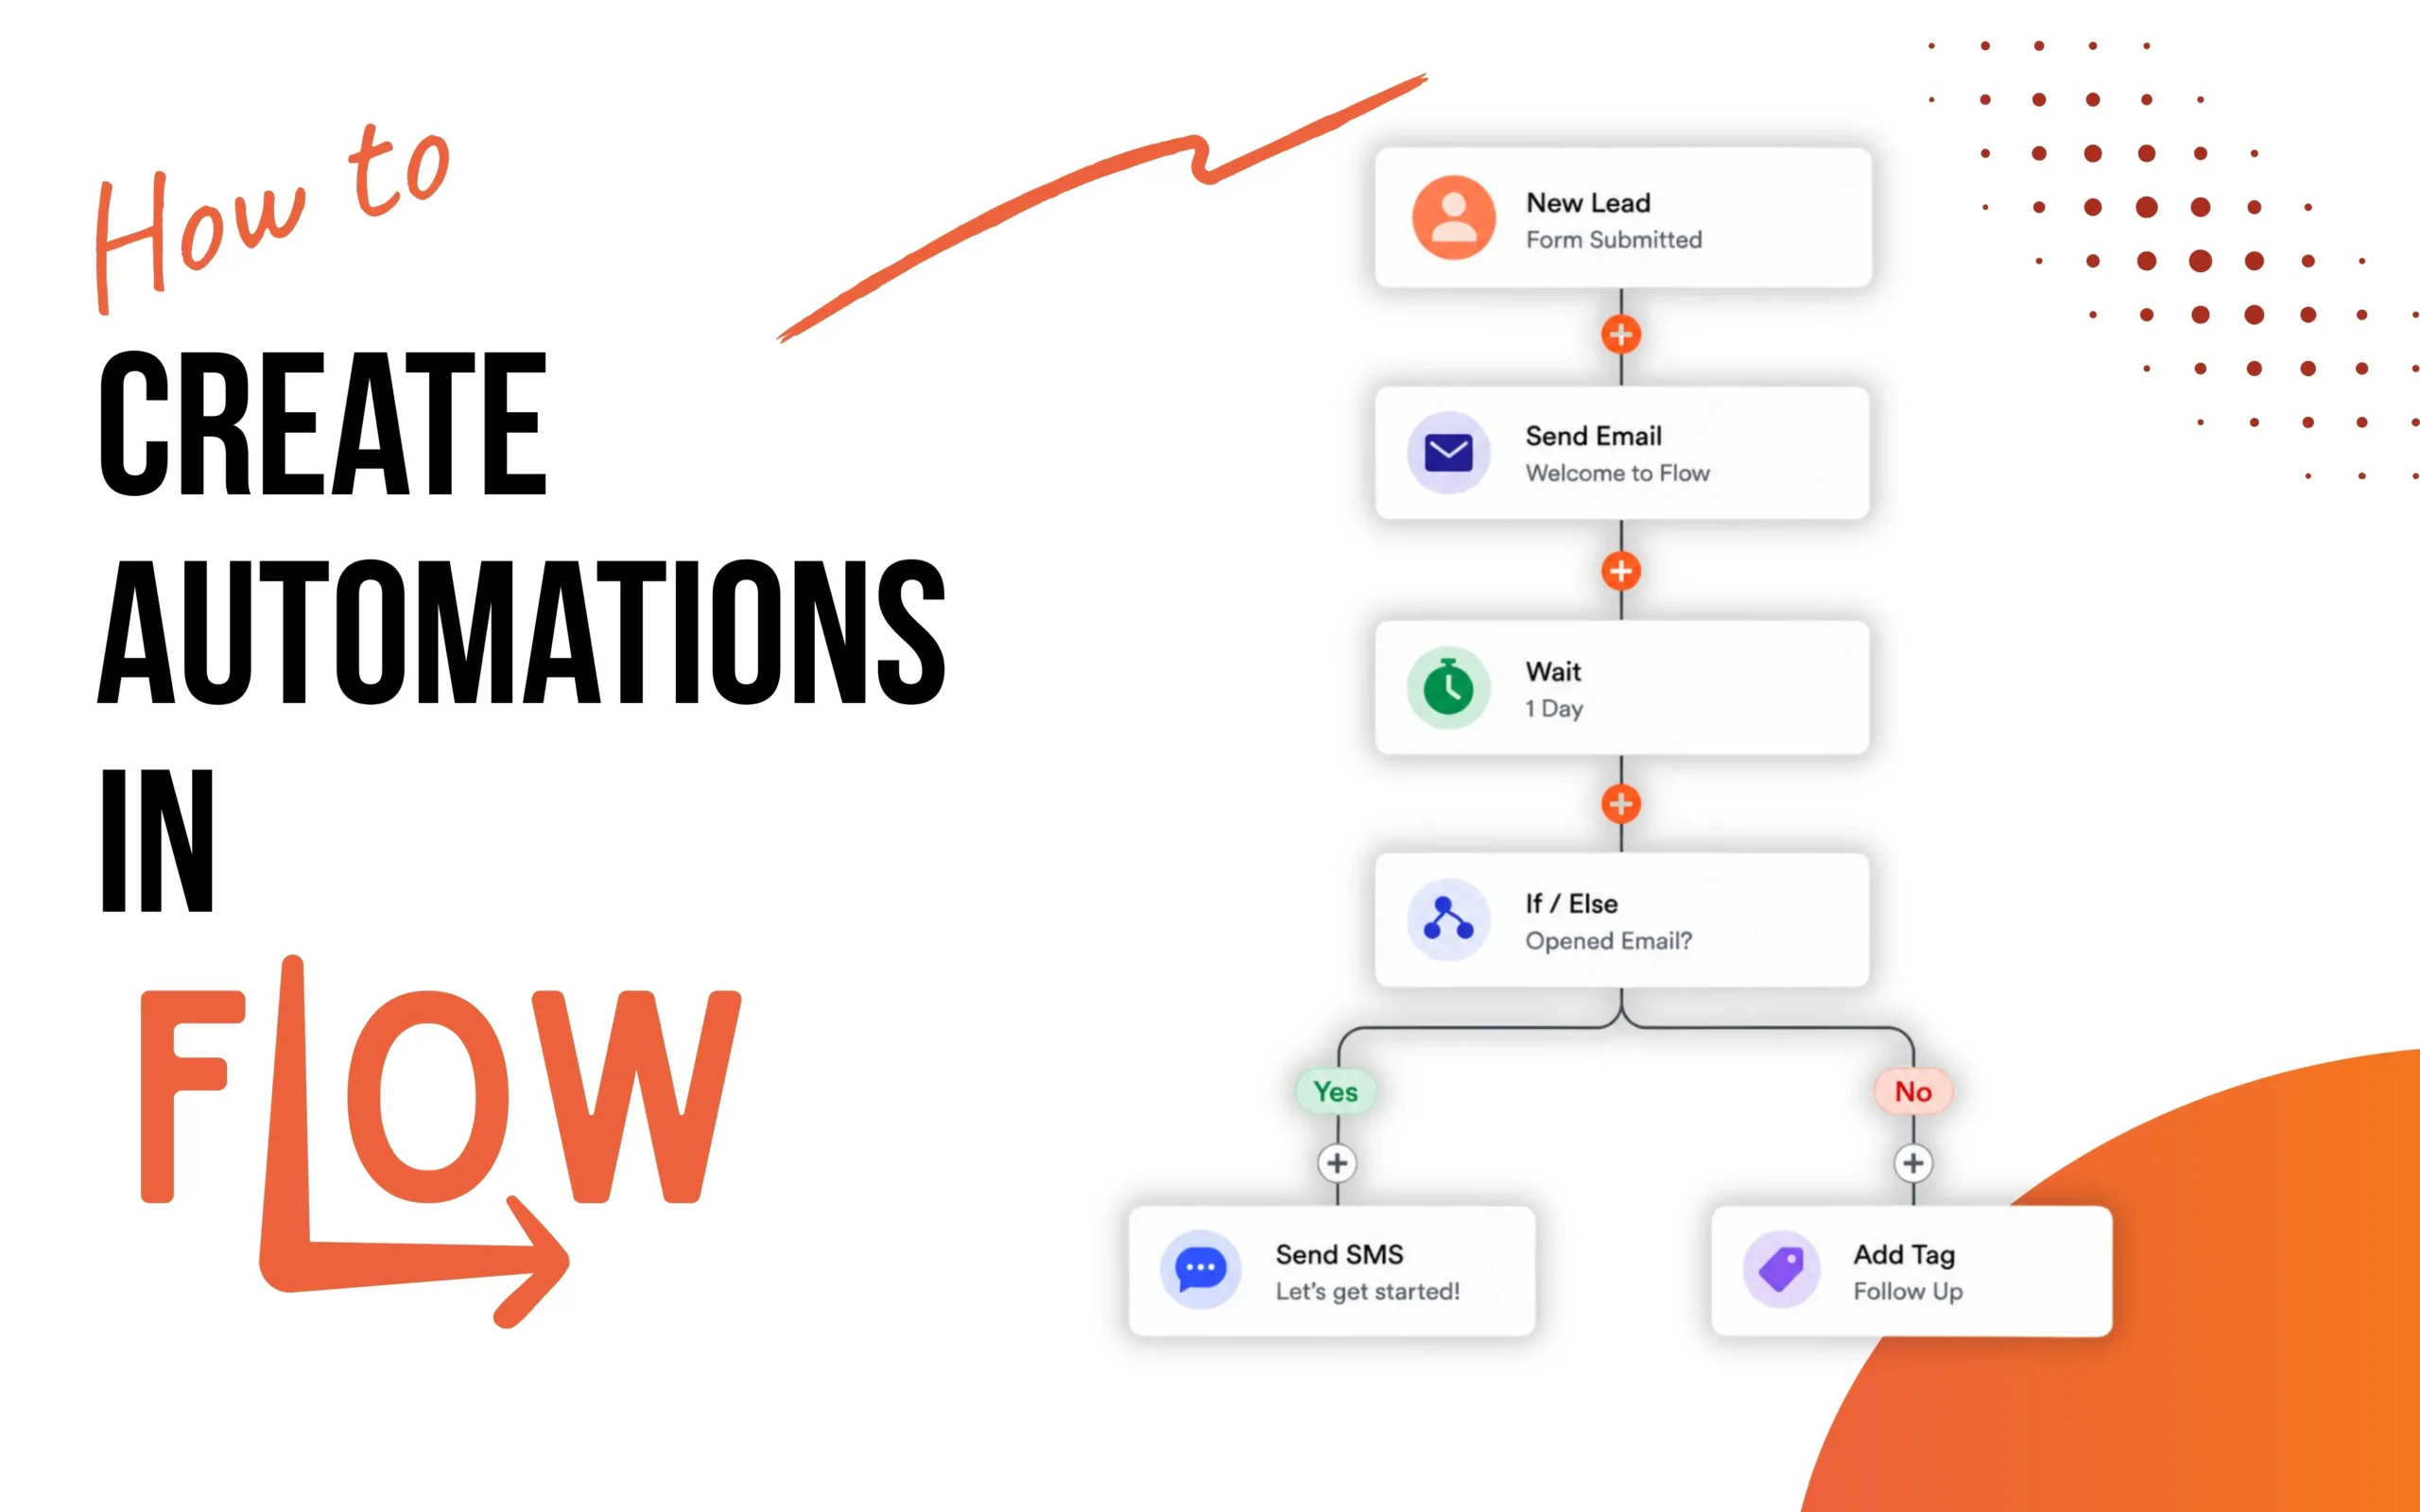
How to create Automations in Flow
📖 10 minute read
Automations are the backbone of any efficient business system and one of the most important to master. In Flow, automations allow you to create intelligent workflows that respond to customer actions automatically, eliminating repetitive manual work and saving you tonnes of time. Once you master automations, your business can operate 24/7 without requiring constant oversight.
What are automations and why do they matter?
Using automations can bring your business to the next level
An automation in Flow is a series of actions that execute automatically when a specific trigger occurs. Think of it as a set of instructions: "When X happens, do Y." For example, when someone fills out a form, automatically send them a welcome email and add them to a follow-up sequence.
Automations save time, reduce human error, and create consistent experiences for your customers. Instead of manually emailing each lead, assigning them to your team, or entering their information into your database, Flow handles all of it instantly.
Why Automations Matter
- Let Your Business Run Itself 24/7: Your automations work while you sleep, whenever your customers interact with your business
- Consistent Experience: Every customer or new enquiry receives the same sequence of messages in the same order, every time
- Customisable: Include fields unique to the individual customer you are talking to to make the experience personal for them. (E.g. by using the custom field {{contact.first_name}} you can start all of your emails with a hello message personal to them)
- Scalability: Handle 10 leads or 10,000 leads with the same automation workflow, allowing your business to grow without needing to re-do anything.
- Time Savings: Eliminate hours of manual follow-ups per week
- Data Accuracy: Information flows automatically between systems without transcription errors
- Better Conversion Rates: Instant responses and nurturing sequences increase the likelihood of enquiries become customers
Automation Basics: Triggers and Actions
Every automation has two core components:
Triggers
Triggers are the thing that starts the automation.
Common triggers could be:
- Form submission
- Contact tag added
- Email link clicked
- Phone call completed
- Appointment scheduled
- Specific date reached
- Custom webhook event
Actions
Actions are the things that happen after the trigger.
Your list of potential actions are enourmous, but common ones could be:
- Send email
- Send SMS
- Add/remove tags
- Create task
- Update contact field
- Assign to team member
- Add to campaign
- Trigger webhook
Automations can have multiple triggers and actions, with delays, conditional logic, and branches that create complex, intelligent workflows.
Creating Your First Automation
Step 1: Access the Automation Builder
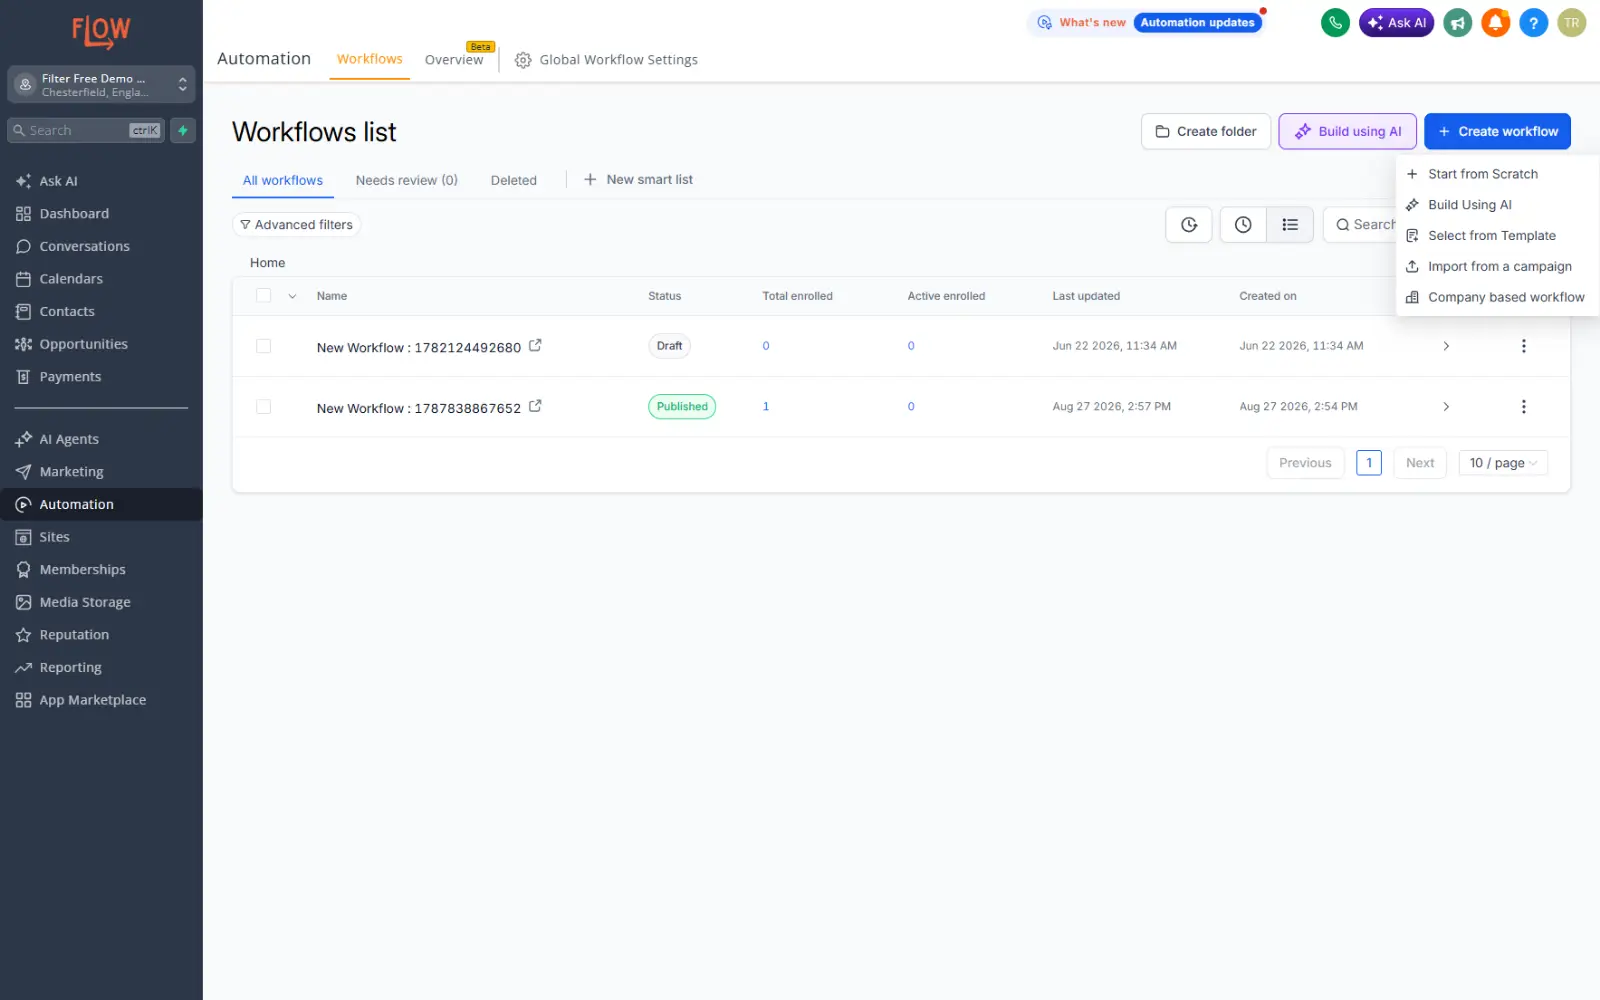
In your Flow dashboard, navigate to Automations → Workflows. Click Create Workflow and Start From Scratch.
Step 2: Choose your trigger
The trigger is what kicks off your automation. Common starting points include:
- Form submission: Automation runs when someone submits a specific form
- Contact tag: Automation runs when a contact receives a particular tag
- Email interaction: Automation runs when someone opens or clicks an email link
- Scheduled date: Automation runs on a specific date or recurring schedule
After choosing your trigger make sure you click save trigger at the bottom of the page.
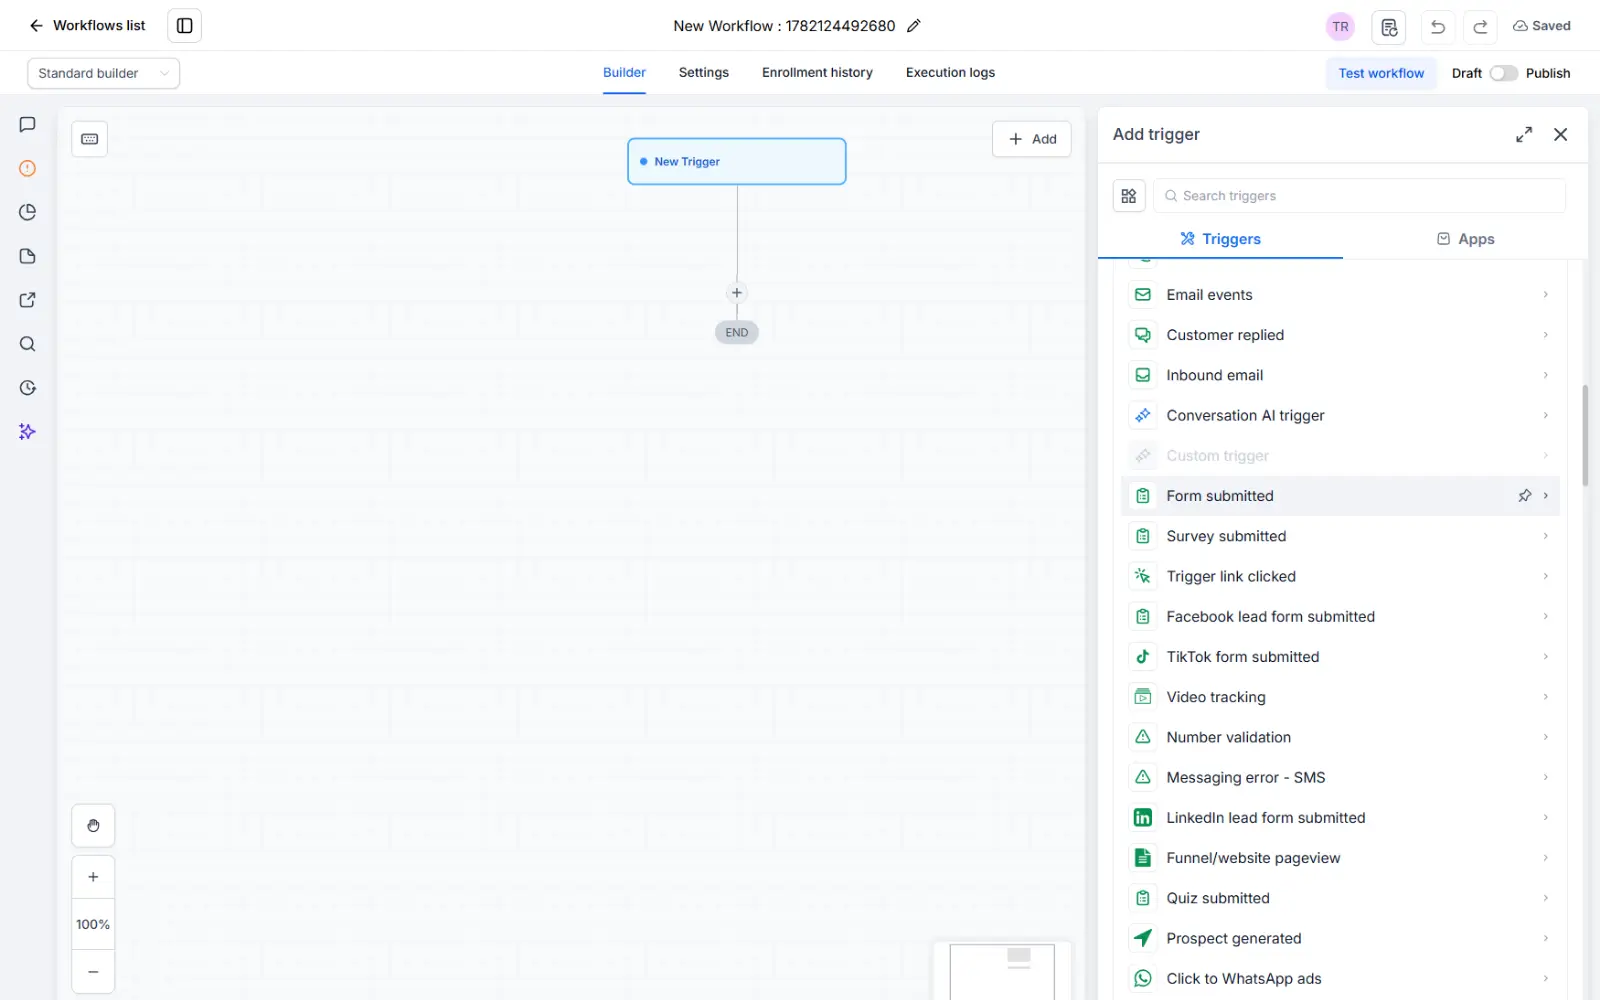
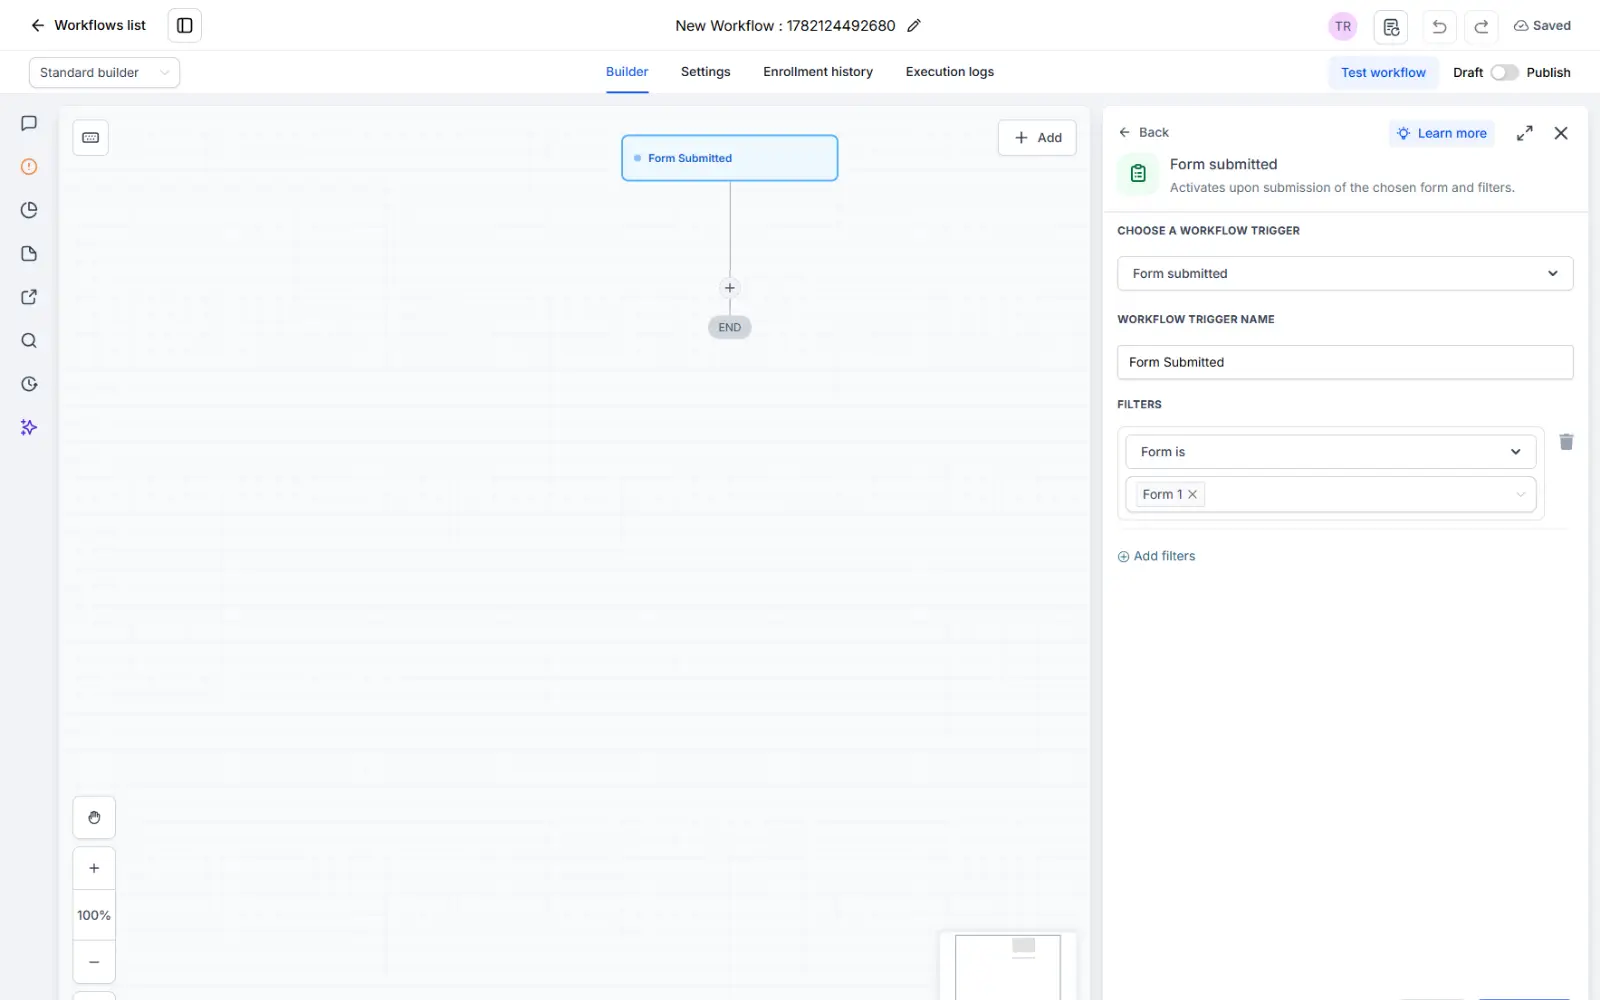
Once you have selected your trigger type, use the filter buttons to choose the specific conditions. For example, if using "form submission," select which form will trigger the automation by filtering 'Form is' - Choose Your Form.
Note: You need to have created a form already for it to appear here. To do that check out our How to Create Forms & Surveys article.
💡 Pro Tip: Use filters for almost any of your triggers
To select the exact tag, form, calendar, contact type or any of your triggers, use the filters to specify exactly when your trigger should fire.
Step 3: Add Your first action
After your trigger, add the action you want to occur. The most common first action is sending an email. This might be:
- A welcome email confirming the contact's submission
- A follow-up sequence asking qualifying questions
- An introduction to your sales team
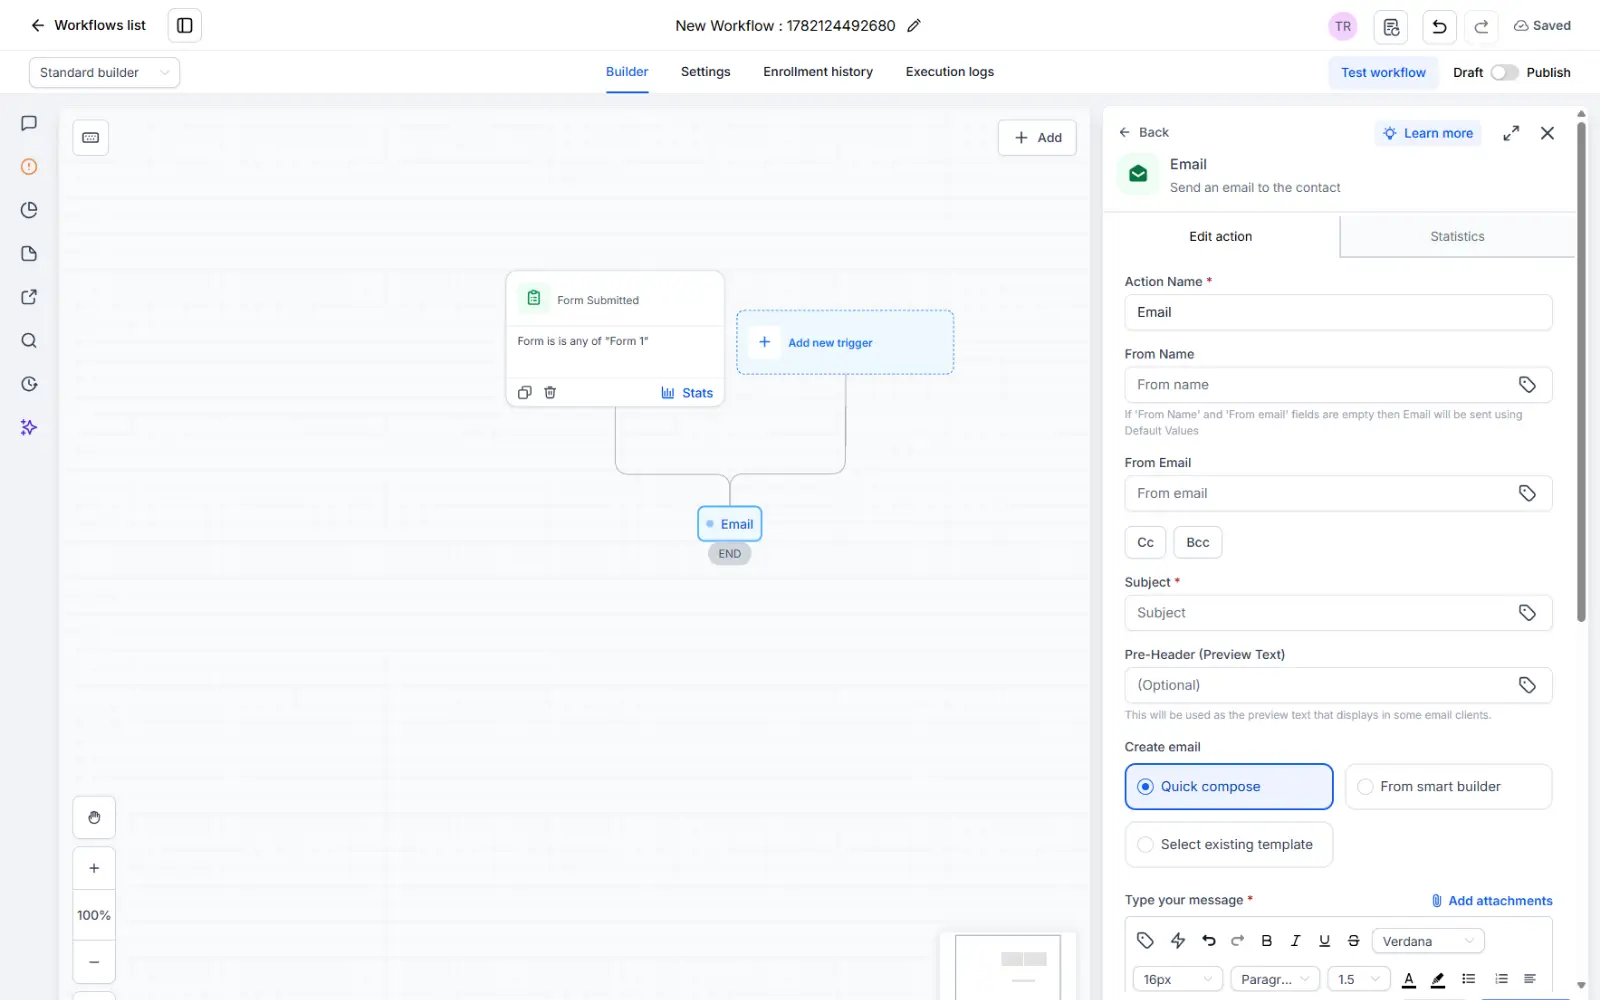
Click Add Action, select "Send Email," and choose or create the email template you want to send using the settings on the right.
Remember to click save action at the bottom of the page when you are done.
💡 Pro Tip: Multi-Channel Actions
Automations aren't limited to email. A single workflow can send SMS, email, Facebook messages and much more.
Step 4: Set delays between actions
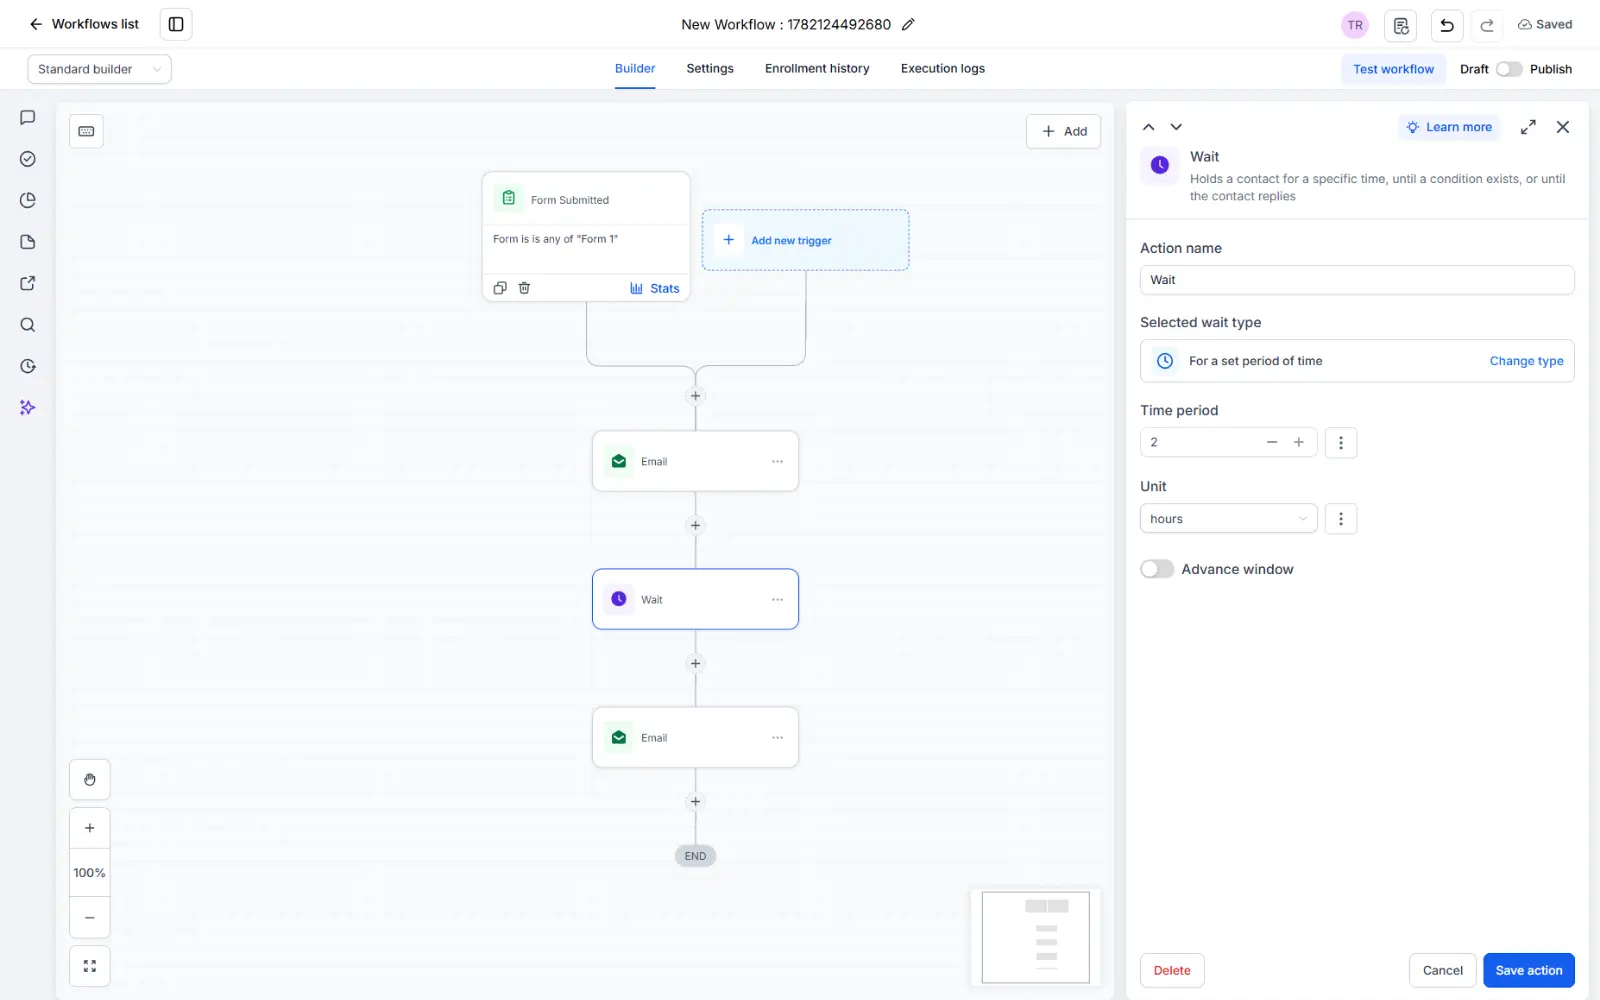
For automations with multiple emails, rather than sending everything immediately, you often want to space them out. After your first action, you can add a delay. Common delays include:
- 1 hour after form submission
- 24 hours before follow-up
- 2 days before next email
This creates a pattern that feels more personal and less overwhelming. No one wants five emails in five minutes.
Step 5: Add Conditional Logic
Make your automation smarter with conditional logic. After an action, you can create branches based on contact behaviour or data:
- If opened email: Send a follow-up sequence
- If did not open: Send a different version or add a tag
- If contact field equals value: Route to different follow-up
- If date range: Apply seasonal messaging
This ensures each contact receives the most relevant experience based on their actions.
Step 6: Test & Activate
Before going live, test your automation:
- Use Flow's test function to trigger the automation as if you're a contact
- Verify all emails send correctly
- Check that delays and conditions work as expected
- Confirm tags and field updates apply properly
Once satisfied, click Activate to turn on the automation. Contacts matching your trigger will now flow through automatically.
💡 Pro Tip: Start small and build it up
You don't need to have everything perfect in one go. Start with one simple automation: a welcome email triggered by form submission. Test it, monitor it, and learn how your contacts interact with it. Then add the next layer of complexity. Within a few automations, you'll have a system that handles most of your repetitive follow-up work automatically. Remember, perfection is the enemy of good.
Automation Ideas & Inspiration
Lead Qualification Sequence
Trigger: Form submission
Actions:
- Send welcome email immediately
- Wait 2 days
- Send qualifying question email
- Wait 24 hours
- If email opened: add to "Engaged" tag; if not opened: add to "Cold" tag
- Route based on tags to different follow-up sequences
Result: Leads automatically segment based on engagement, so your sales team focuses on hot prospects first.
Appointment Reminder Sequence
Trigger: Appointment scheduled for 3 days from now
Actions:
- Wait until 48 hours before appointment
- Send email reminder with calendar link
- Wait until 24 hours before appointment
- Send SMS reminder with appointment details and cancellation link
- Wait until 1 hour before appointment
- Send final SMS reminder
- If appointment marked "No Show": trigger no-show recovery automation
Result: Dramatically reduce no-shows. Most people forget appointments, so timely reminders help everyone.
Re-engagement Campaign
Trigger: Contact hasn't opened email in 60 days
Actions:
- Send email: "We miss you! Here's what's new"
- Wait 3 days
- Send second email: "50% off if you come back this week"
- Wait 2 days
- If still no open: remove from regular campaigns and add "Cold" tag
- Move to low-frequency nurture sequence
Result: Separate engaged contacts from unengaged ones. Stop wasting email sends on dead prospects.
Review Request Automation
Trigger: Customer completes purchase
Actions:
- Wait 5 days (let them experience the product/service)
- Send email: "We'd love your feedback"
- Include direct links to review platforms (Google, Trustpilot, etc.)
- Wait 3 days
- If no review submitted: send follow-up email with incentive (discount, entry to prize draw)
- Wait 2 days
- If still no review: send SMS reminder
- Once review is submitted: send thank you email
- If review is 5-star: send referral request ("Share this with a friend")
- If review is 1-3 stars: flag for support team to address concerns
- Wait 30 days
- Send "Thanks for the review" email with exclusive offer
Result: Systematically collect reviews without manual follow-ups. Separate happy customers (ask for referrals) from unhappy ones (fix problems). Build social proof automatically.
Best Practices
- Start Simple: Build a basic welcome automation first. Add complexity once you understand the basics.
- Test Thoroughly: Always run test submissions through your automation before activating for real contacts.
- Use Descriptive Names: Name automations something clear like "Demo Booking Follow-up" not "Auto 1".
- Document Your Logic: Add notes explaining why each step exists, especially if someone else will manage these later.
- Monitor Performance: Check how many contacts flow through, open rates, click rates, and conversion rates for each automation.
- Respect Preferences: Include unsubscribe options in emails and always honour contact communication preferences.
- Segment Your Audience: Use tags and conditions to ensure contacts get relevant sequences, not generic ones.
- Test Different Timing: A/B test delay periods and times of day. 2-hour delays might work better for your audience than 24-hour delays.
Common Mistakes to Avoid
- Ignoring Conditions: Sending the same message to everyone, regardless of their behaviour or profile, is ineffective. Use conditions and custom fields to personalise.
- Sending Too Fast: Multiple emails in quick succession overwhelms recipients. Space them out realistically.
- Not Segmenting: Sending a "welcome" email to an existing customer looks unprofessional. Always segment by contact type or behaviour.
- Forgetting the Unsubscribe: Every automated email must include an unsubscribe option or you'll damage your sender reputation.
- Setting and Forgetting: Automations need monitoring. Check performance regularly, update messaging, and retire automations that aren't working.
- Conflicting Automations: If multiple automations trigger on the same contact, they might send conflicting messages. Use tags to prevent overlap.
- No Clear Purpose: Every automation should have a defined goal. If you can't articulate why it exists, you probably don't need it.
Automations are where Flow truly shines. They transform your business from manual, reactive work to intelligent, proactive systems that serve your customers 24/7.
Start with one simple automation: a welcome email triggered by form submission. Test it, monitor it, and learn how your contacts interact with it. Then add the next layer of complexity. Within a few automations, you'll have a system that handles most of your repetitive follow-up work automatically.
The key is starting simple and building from there. Master the basics, then explore conditions, delays, and multi-channel messaging. Your future self will thank you for the systems you build today.