
How to Create Booking Calendars in Flow
📖 15 minute read
Booking calendars let customers see your availability and book appointments in seconds. No back-and-forth emails, no juggling schedules. They pick a time slot, confirm their details, and they're booked. For coaches, consultants, hairdressers, therapists, trainers, and any business that works with appointments, a booking calendar transforms how you operate.
What Are Booking Calendars and Why Use Them?
Booking calendars can save you hours of admin each week
A booking calendar is an online scheduling system that shows your available time slots and lets customers book directly. It sits on your website, in a form, or in an email, and handles the entire booking process automatically.
Without a booking calendar, your workflow looks like this: customer emails to ask about availability → you check your calendar → you respond with options → customer picks one → you confirm → you manually add to your calendar. This takes hours and generates support emails.
With Flow's booking calendar, the workflow is: customer sees available slots → picks one → books instantly. Your calendar updates automatically. Automations send confirmation, reminders, and follow-ups. Zero manual work.
Use booking calendars to solve common business problems
- Save time: No scheduling emails or phone calls. Customers book themselves.
- Reduce no-shows: Automatic reminders 24 hours and 1 hour before appointments dramatically reduce no-shows
- Increase bookings: It's easier to book instantly than to email back and forth. Impulse bookings happen.
- Capture information: Collect custom details before booking (e.g., "What's your biggest challenge?" for coaches)
- Automate follow-ups: Post-booking automations send prep materials, meeting links, and follow-up content
- Sync across devices: Your calendar syncs with Google Calendar, Outlook, or Calendly so double-bookings never happen
- Get paid upfront: Require payment at booking so you never do unpaid consultations
Types of Calendars in Flow
When you create a calendar in Flow you have a number of different options. Use the calendar type that's most suited for your business. The most common calendar types and their uses are below:
Personal Booking Calendar
Simple time-slot booking
Customer picks a date and time from your available slots. No packages, no pricing, just booking. Example: "30-minute discovery call" with no cost (or free).
Service Calendar
Multiple services with pricing
Offer different services at different prices and durations. Customer chooses which service, then picks a time. Example: Haircut (£50) - 60mins, Hair Colouring (£100) - 120mins.
Class Booking Calendar
Fixed time slots for classes
Show specific class times (e.g., "Yoga Monday 9am", "Bootcamp Wednesday 6pm"). Customers sign up for a specific class that will have multiple slots. Seat limits optional.
Round Robin Calendar
Rotate bookings around team members
Customers book an appointment and the system books with the next team member assigned. Good for businesses with multiple people in their sales team.
Creating Your First Calendar
Step 1: Connect your google/outlook calendar
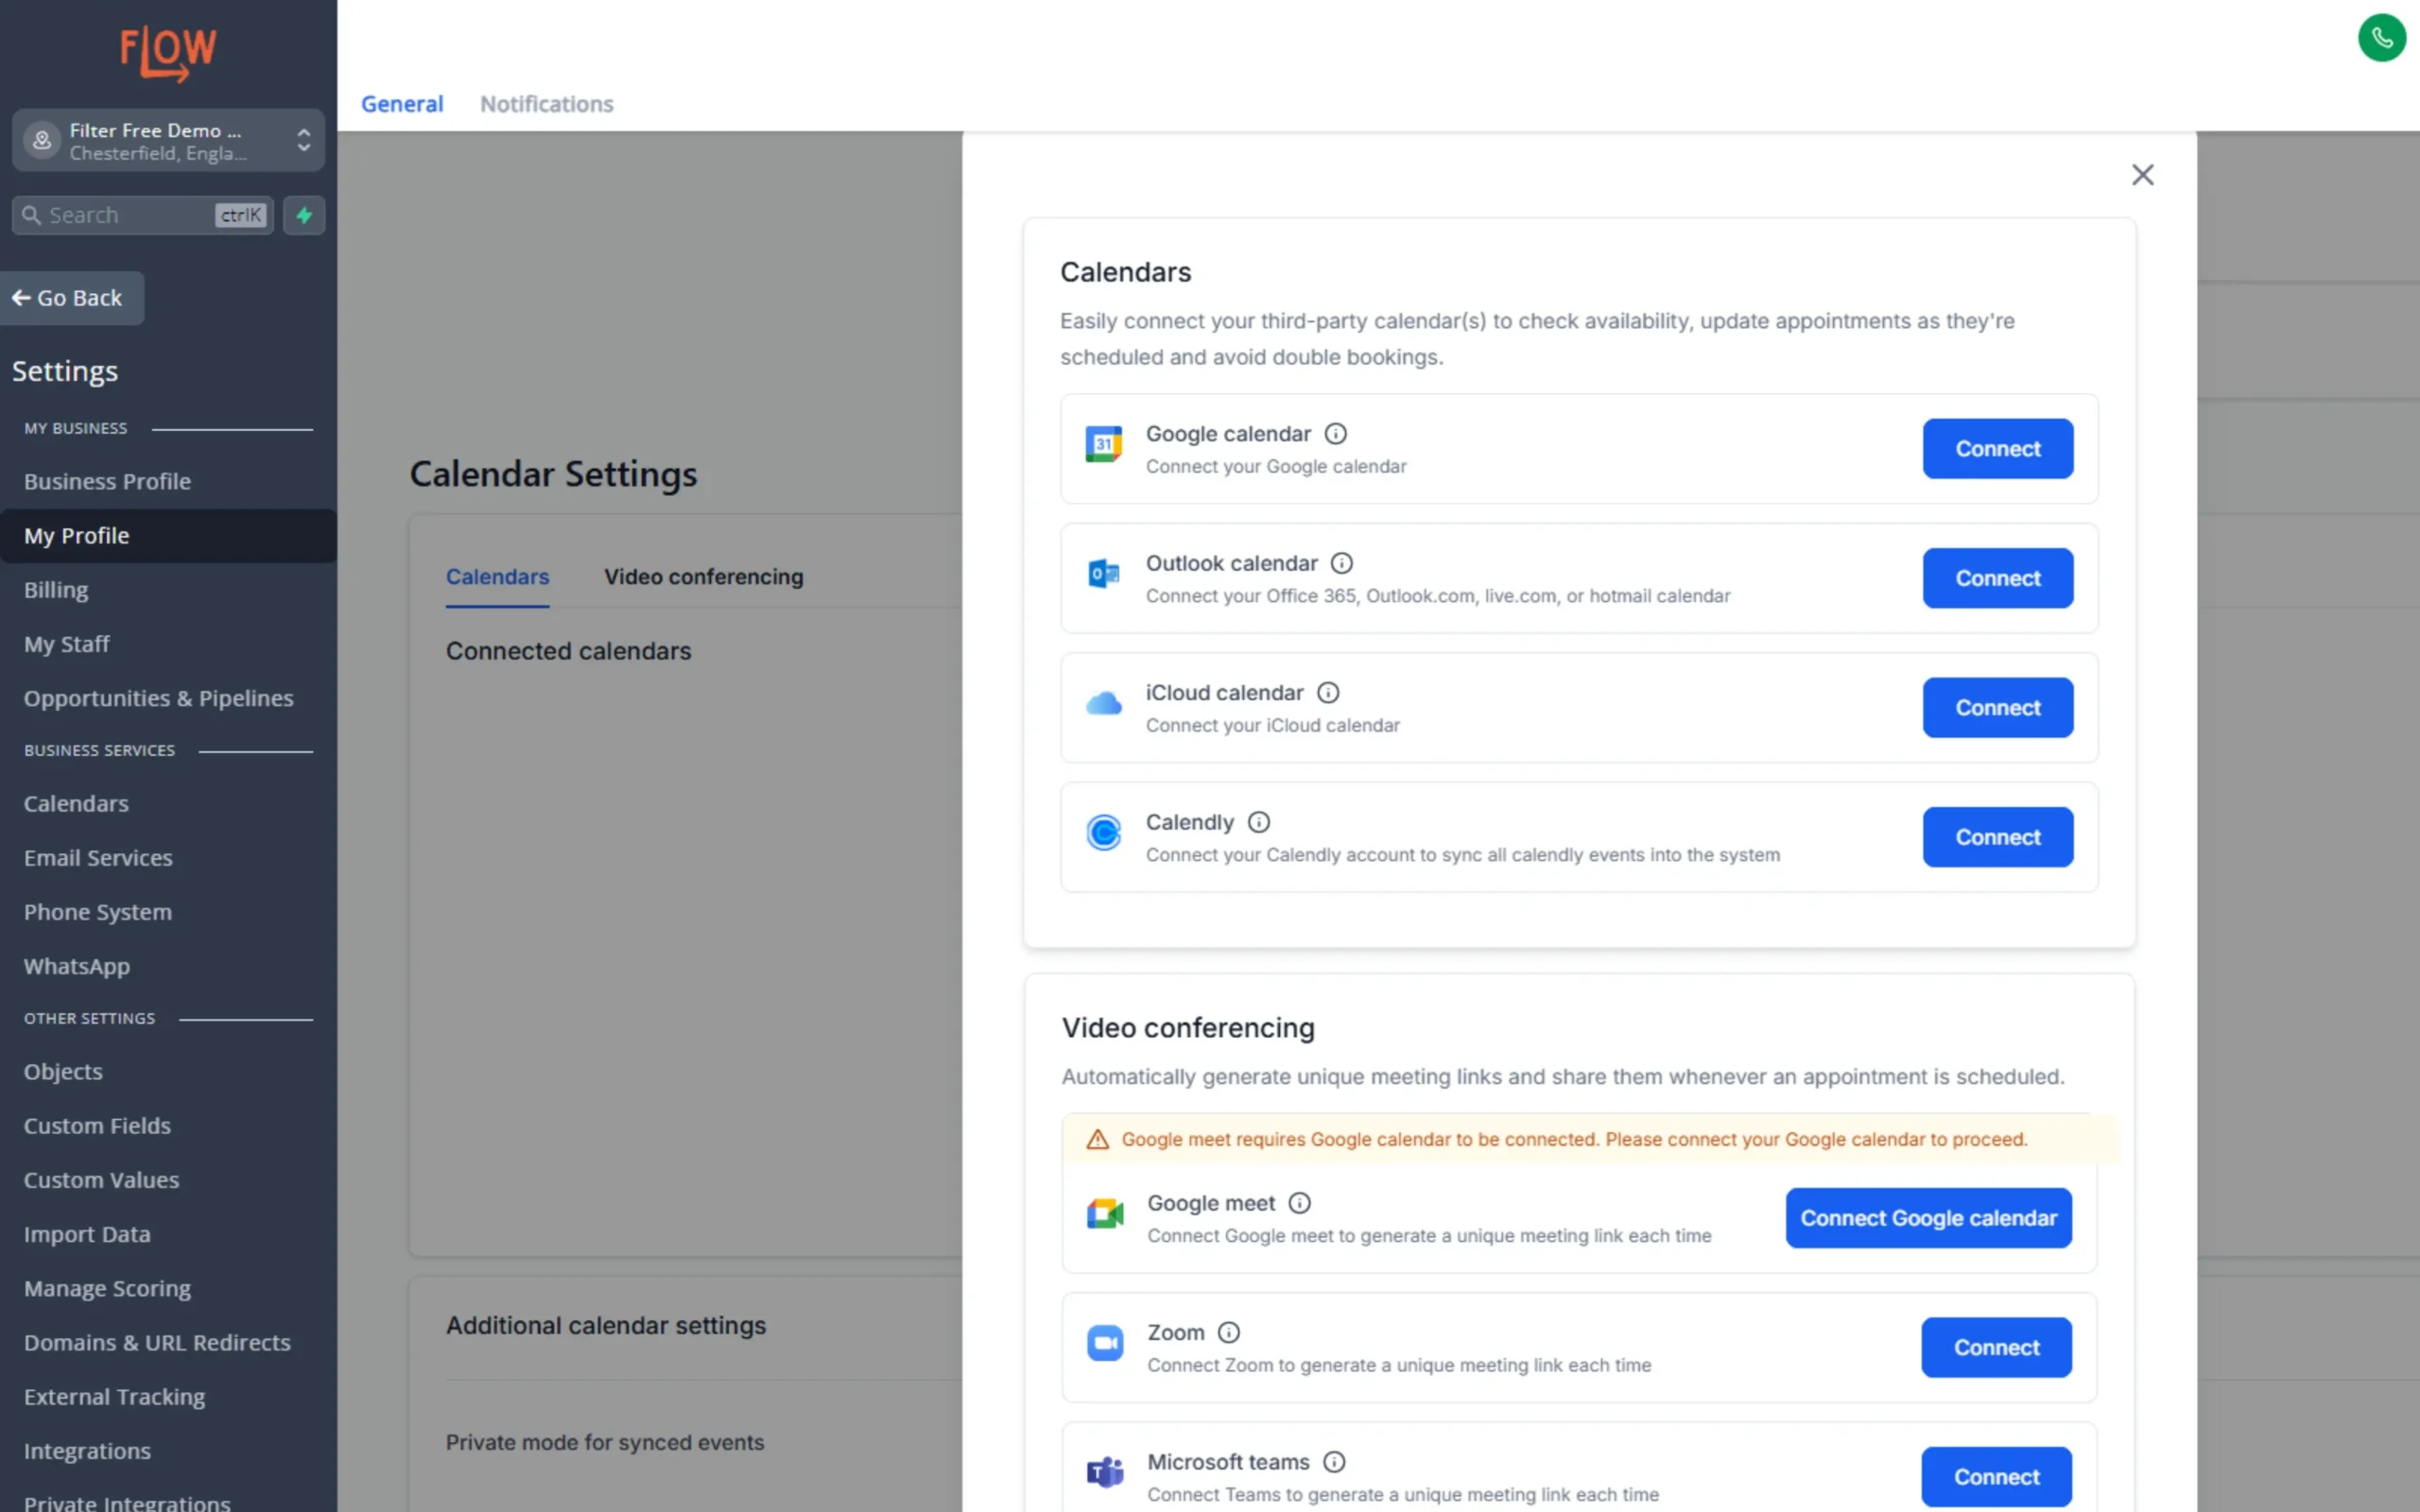
If you haven't already, connect your calendar to your profile by going to Settings - My Profile, scroll down to calendar settings and click Add New. Here you can follow the instructions to sync your calendar of choice.
By doing this, you can now choose your settings to allow Flow to to avoid scheduling conflicts within your calendar, and automatically add appointments in for you as they are booked.
For example, if you link your personal google calendar and set it to avoid conflicts, if you have something in your google calendar at 09:00 on Monday morning, that slots will not be available to book in Flow calendars.
💡 Pro Tip: Video conferencing (optional)
If you plan to use your calendar to book video calls with customers, now is a good time to also connect your video conferencing account in Google Meet, Zoom or Teams to Flow, just follow the instructions after you select the connection option here.
Step 2: Create a calendar
Visiting the calendar page on Flow shows you your current calendars and appointment bookings, but to create a new booking calendar you need to go to Settings - Calendars first.
Click New Calendar and select your calendar type. For this guide we will use the Personal Booking Calendar. Click here to find out more about setting up a service calendar further into this guide.
Step 3: Configure calendar settings
Choose your calendar's name, description, team member assigned and meeting duration and then save your calendar. After saving, click on advanced settings when editing your event.
Advanced settings allow you to customise much more about your calendar, including:
- Upload Logo - Edit the image associated with your calendar
- Meeting Invite title - Edit the name of the meeting when booked (use custom fields to include clients names etc.)
- Meeting location - Choose a permanent location or use your video conferencing service that you connected in step 1
- Availability - Set the times that you want users to be able to book an appointment in this calendar. You can set the same times available each week, or choose specific dates & times.
- Booking rules - Set meeting interval & buffer times to control how much of a gap the calendar will leave between available slots. Set scheduling notice and date ranges to control how far in advance users can book a slot e.g. Must be at least 24 hours before meeting, up to 2 weeks in advance.
- Form & confirmation - Use the default booking form or create your own and link it here. To create your own form check out the lesson 'How to create forms & surveys in Flow'.
- Payments - If you have linked your Stripe account you can turn on payments here and configure how much your session will cost. Customers will need to pay through Stripe upon booking.
- Notification & Policies - Edit the notifications or email/sms reminders that you and your customers will get when using the calendar. You can either set your email reminders up here within your calendar, or if you need more customisation options you can control it all within the automations section of Flow (See the lesson 'How to create automations in Flow'). Choose if you allow rescheduling or cancellations for this booking.
- Widget appearance - Set your colours and branding to customise the look of your calendar.
Step 4: Save and SHare your calendar
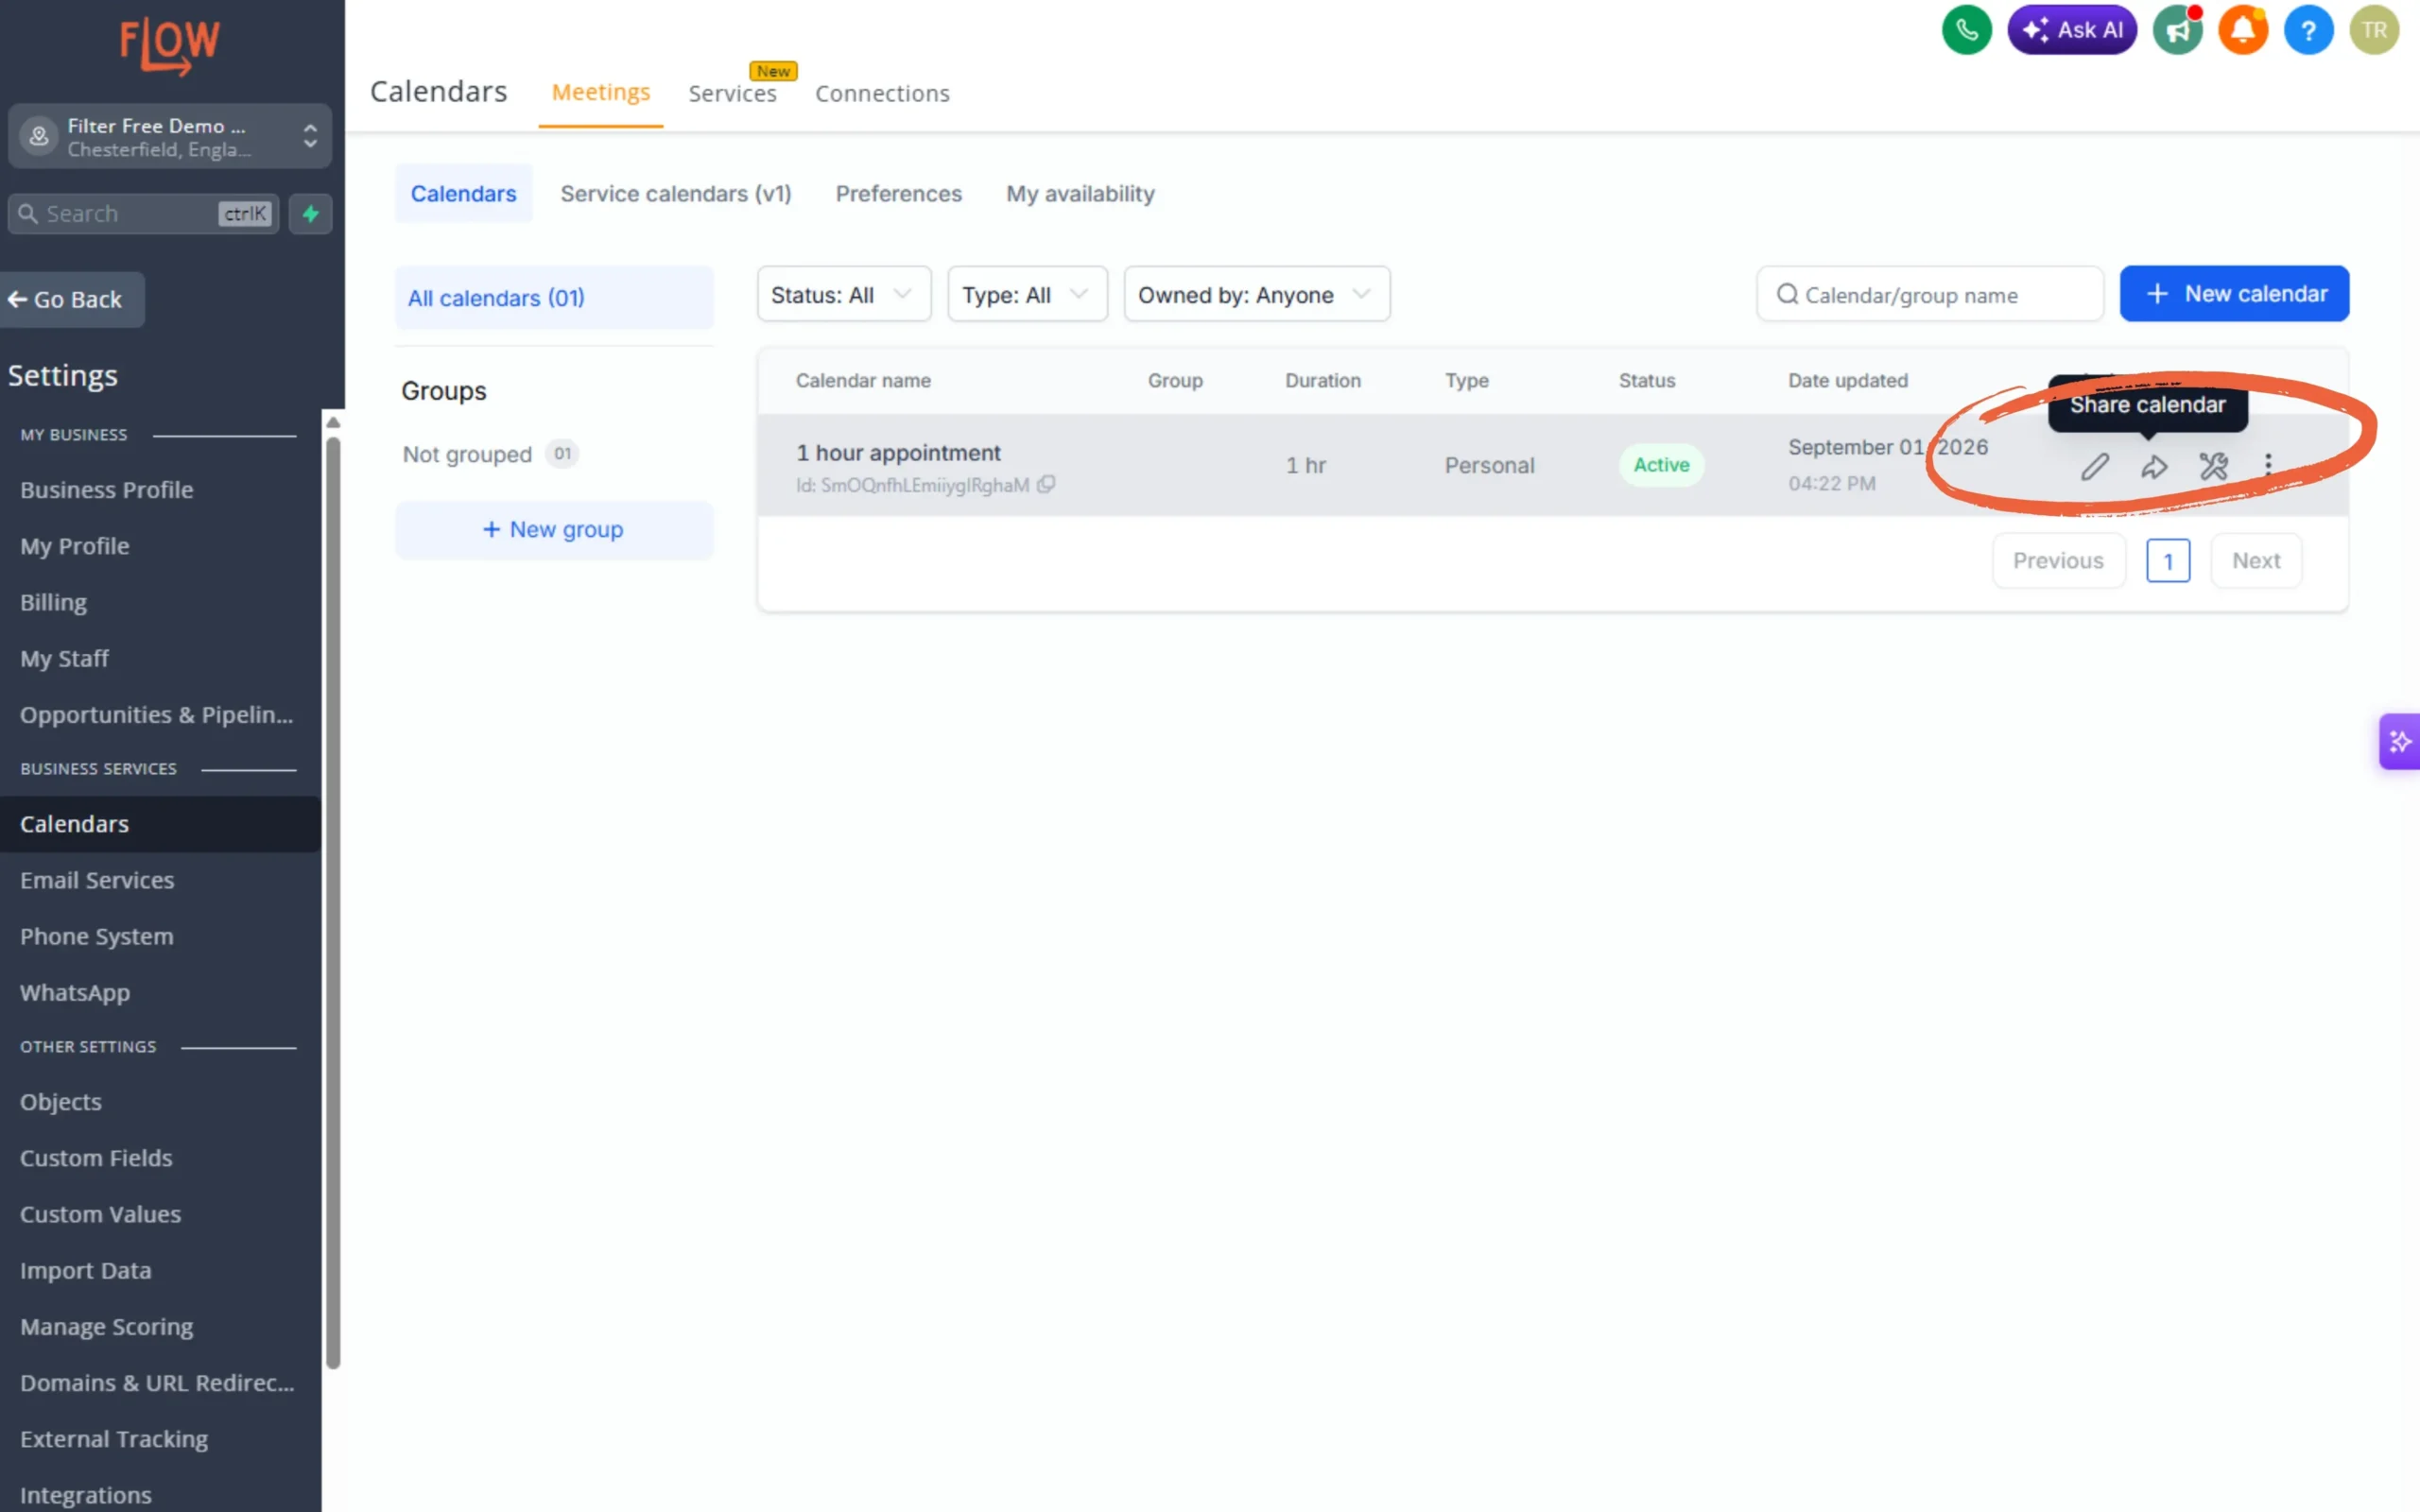
Click save at the top of the page. On your Settings - Calendar page you should now see the calendar that you have created. Share it by clicking the share button on the right of your calendar row. Choose a sharing URL to link to from a button on your website or social media, or send it directly to customers. Choose the embed code to paste into your website to have your form appear right on your page.
💡 Pro Tip: Include your calendar in your Flow funnel or web page
To add your calendar to a page built in Flow you don't even need to embed it using the code, you can choose it directly from the website builder.
Creating a group calendar
What is a group calendar?
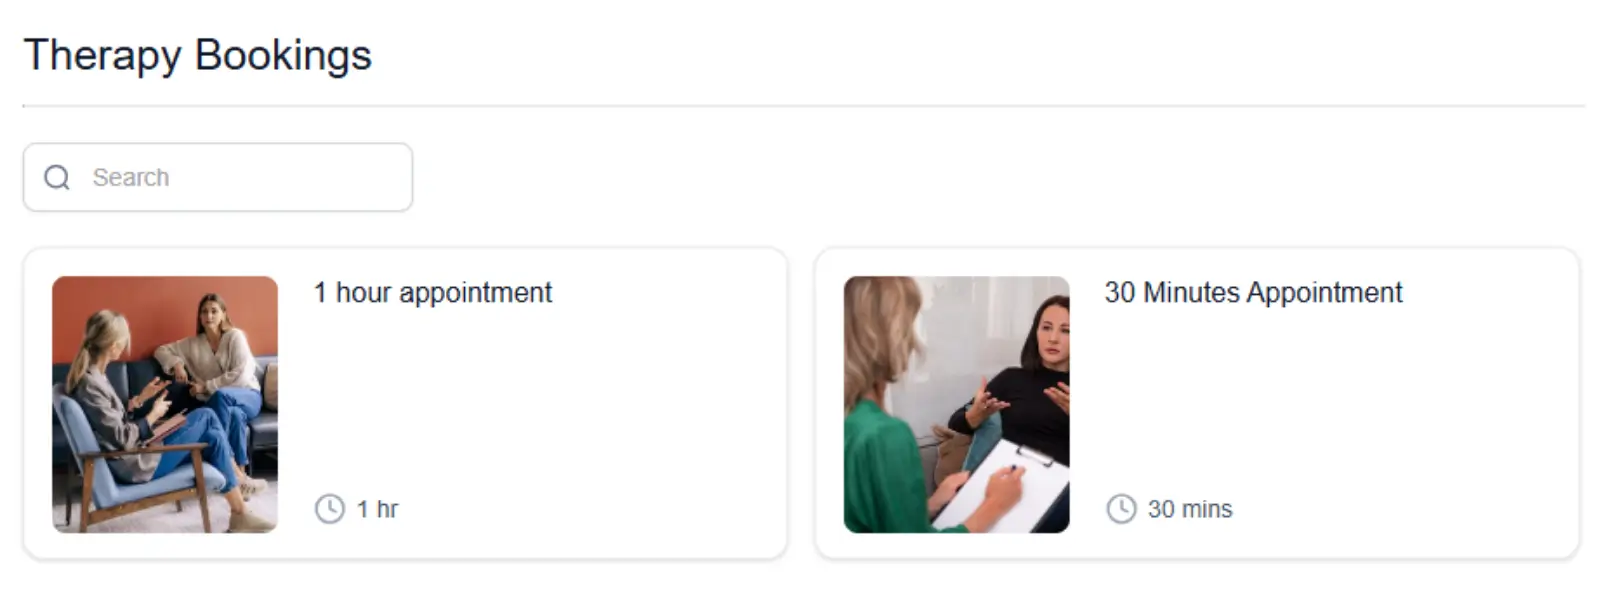
Once you have created more than one calendar, you may want to display them as a choice side by side on the same calendar link. You can create a group calendar to do this.
Step 1: Create a group in your calendar settings
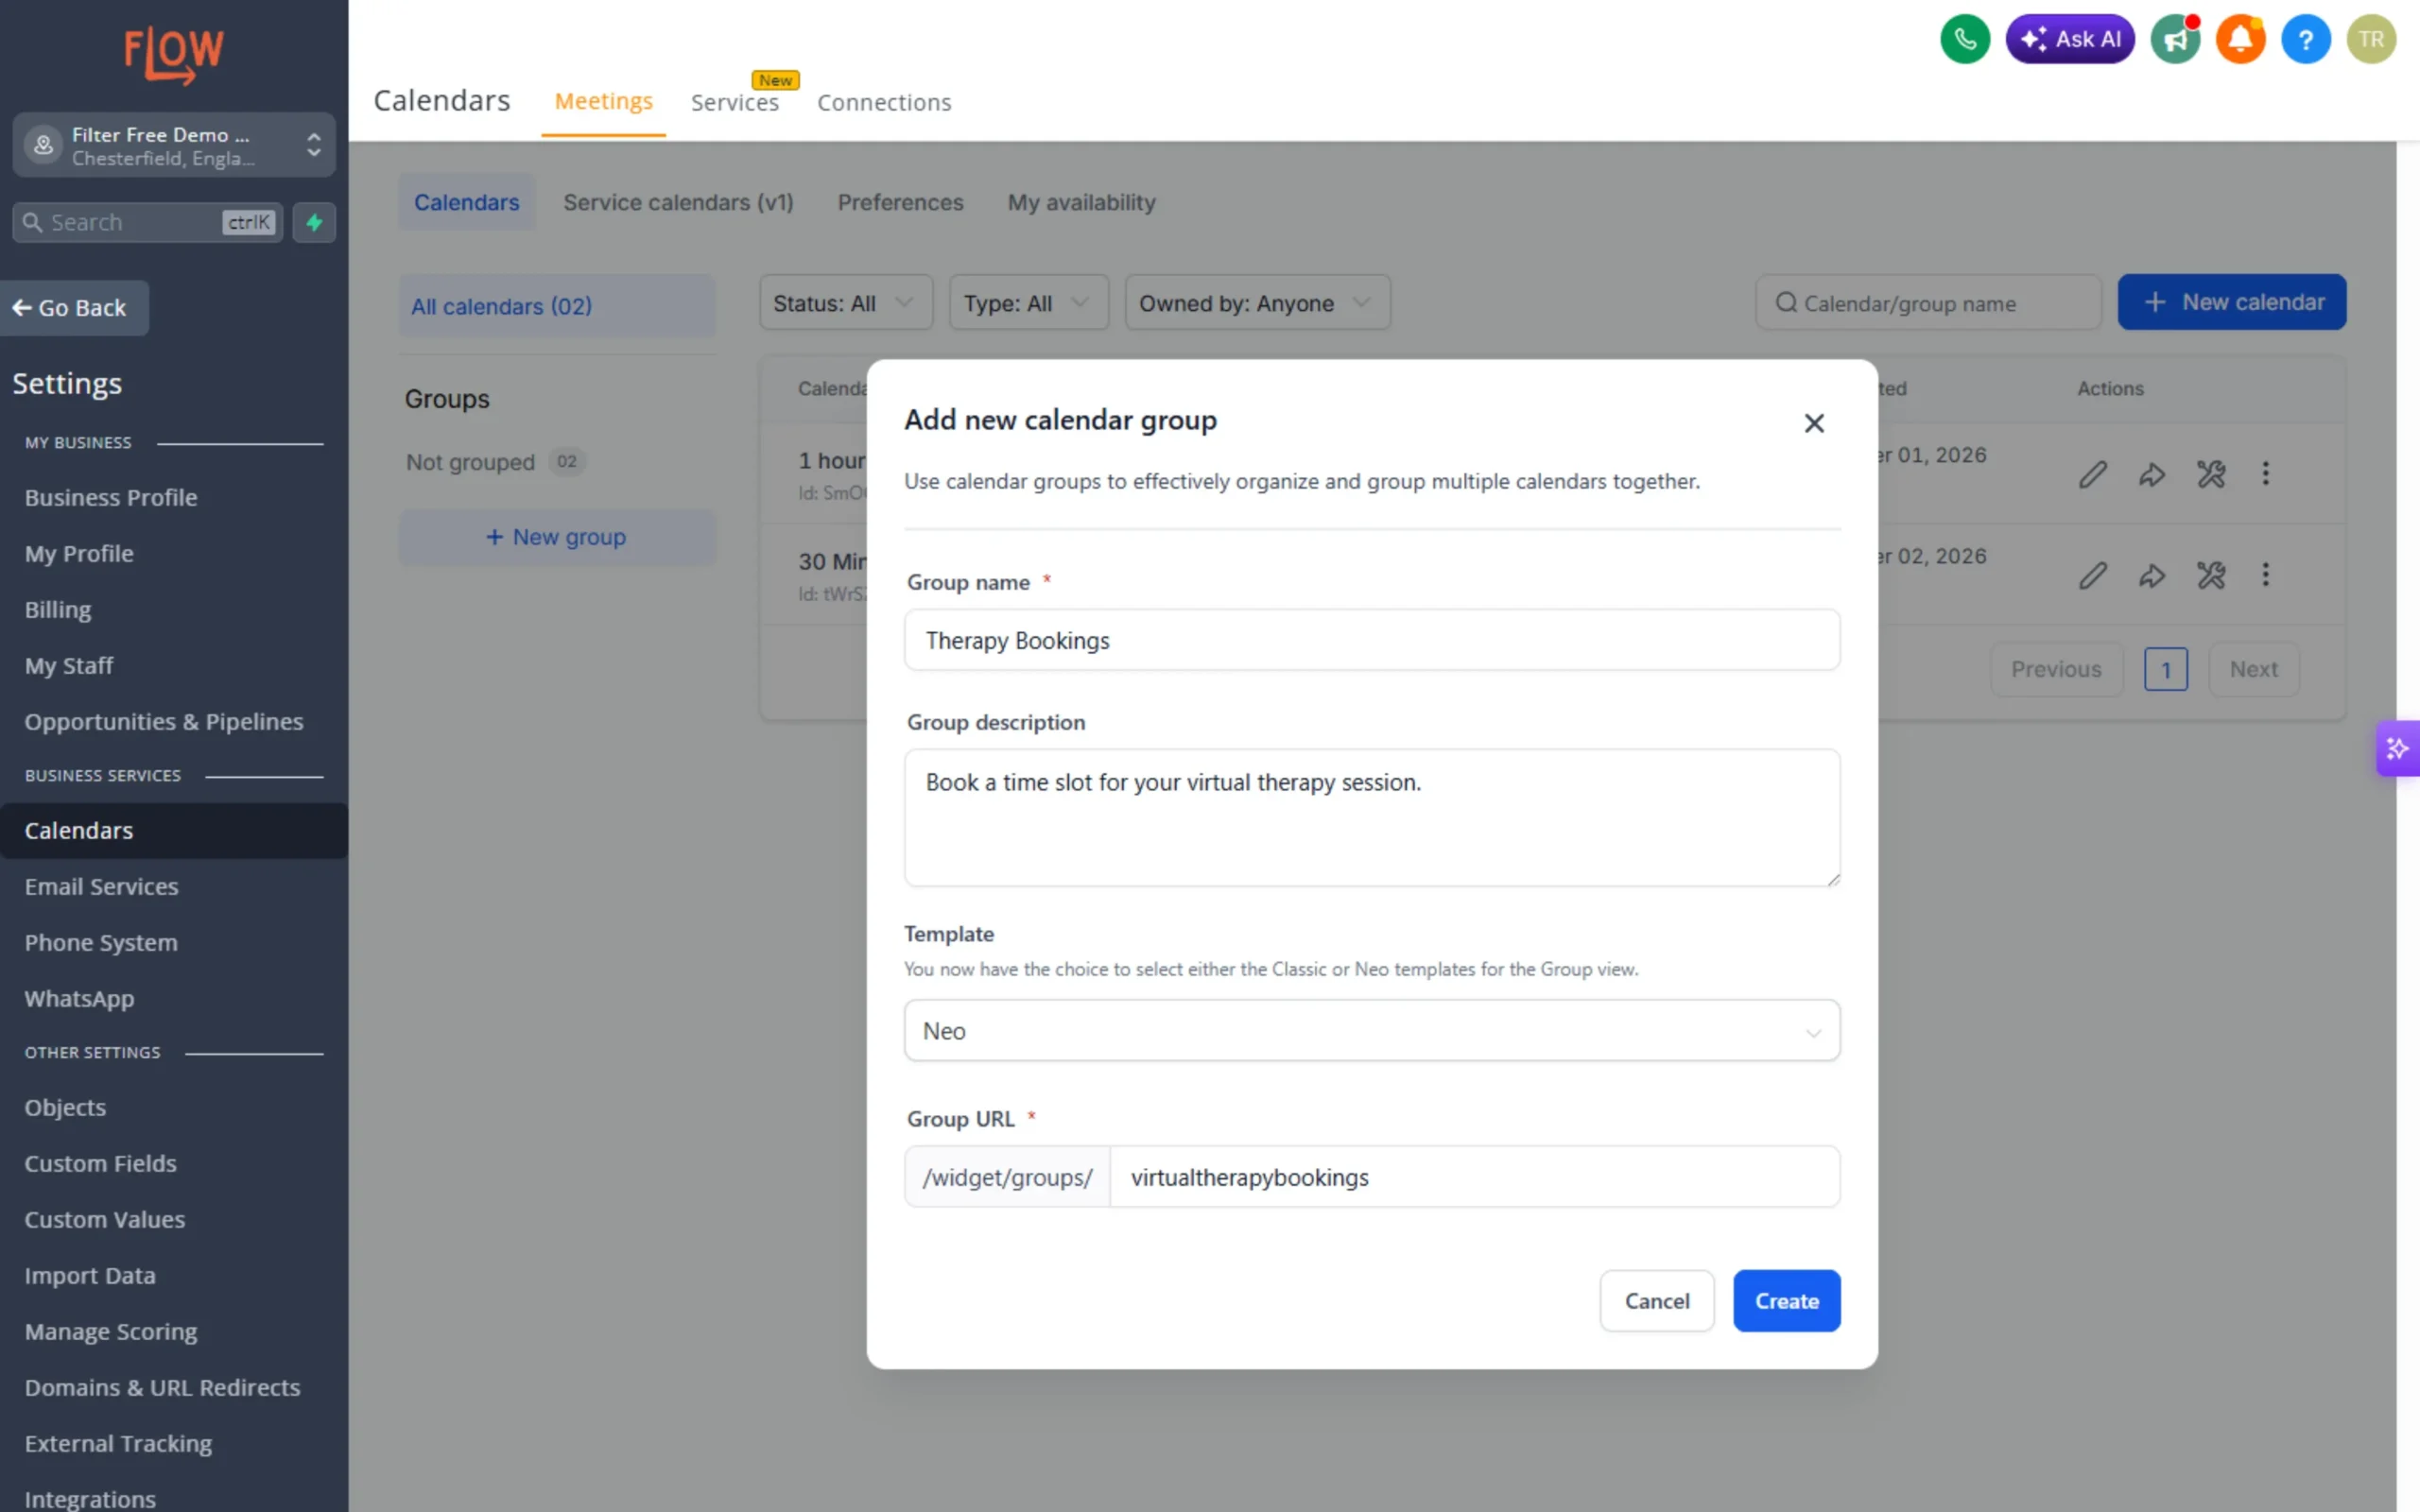
Staying in Settings - Calendars, click + New Group on the left, then give it a name, description and URL.
Step 2: Add individual calendars to your group
You can add your calendars straight away to your group. Or you can click back to all calendars, click the 3 dots on the calendar you want to move into the group and click move to group.
Step 3: Share your group calendar
On the groups on the left, click the 3 dots on the group you want to use. Click share group to get URLs and embed codes to use your group calendar.
Changing your availability
What does my availability affect?
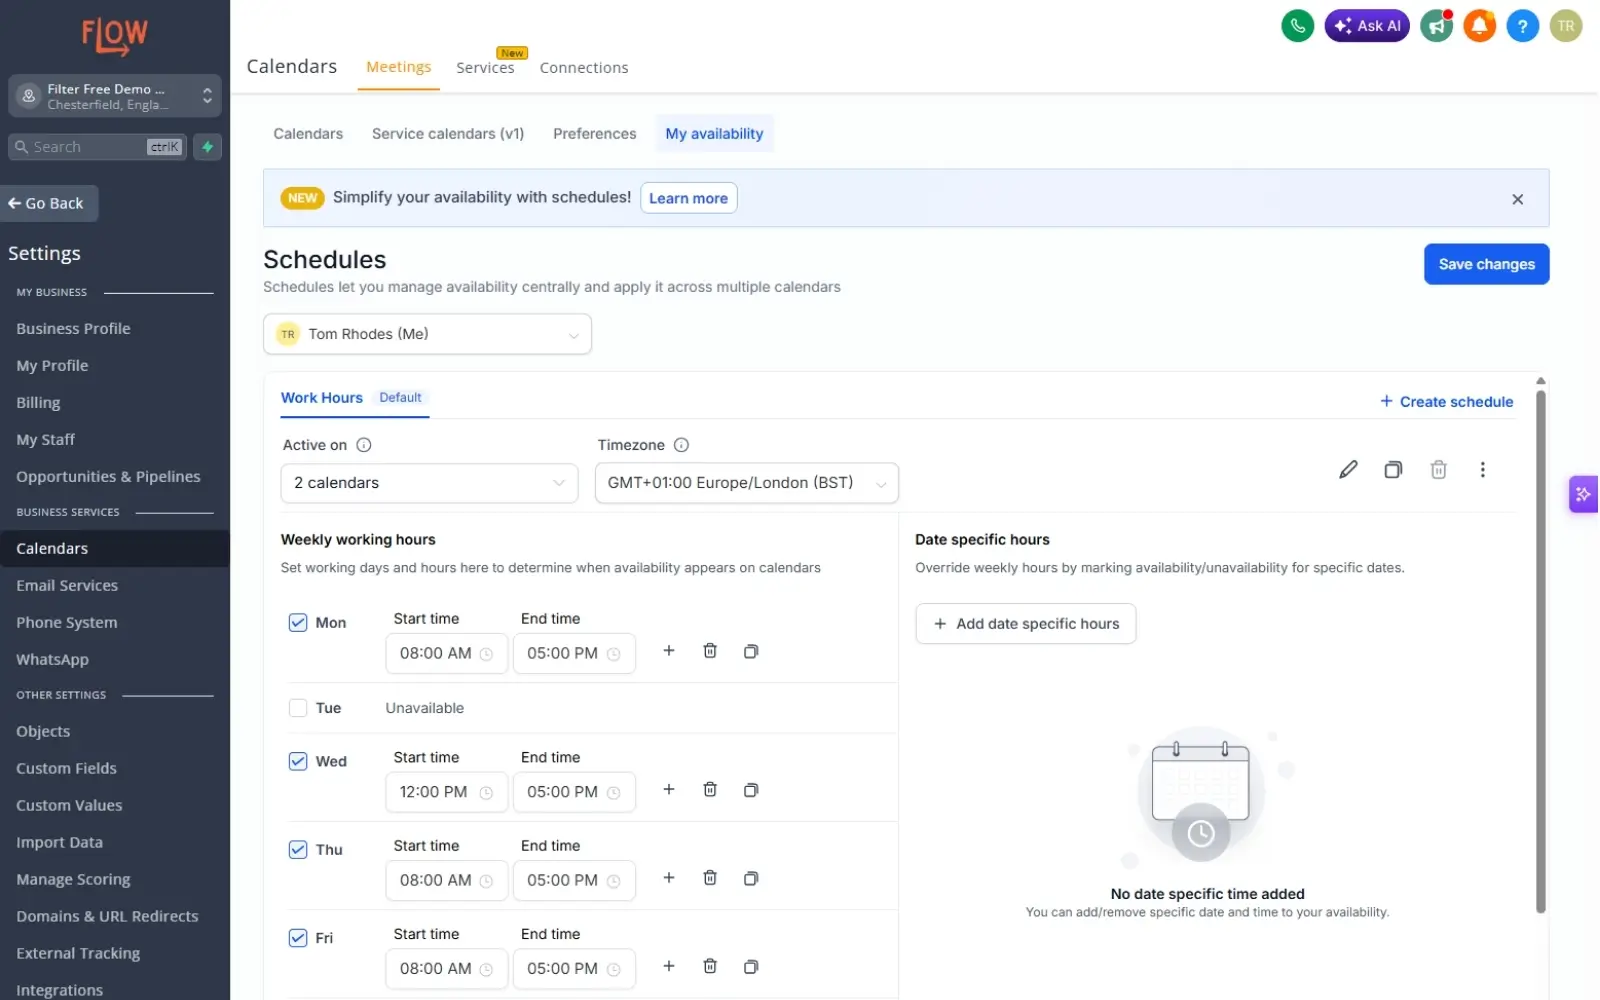
Your availability assigned to a calendar allows appointment bookings only in the time-slots you have made available. You can have multiple different schedules, each assigned to a different calendar. Or use the same schedule for all calendars together.
How do I set my availability?
You can set availability for yourself and staff members on your account if you are the account admin.
Go to Settings - Calendars and click My Availability along the top bar to start.
Here you can set a schedule on a weekly basis, or on individual days if you prefer. You can also create multiple schedules by clicking + Create Schedule.
Once created tick the calendars you want to assign this schedule to, or link them from inside that calendar's settings.
Post-booking automations
Automate everything that happens when someone books
Remember, automations are the thing that can save you the most time when running your business. By linking them to your calendars all within Flow, you can send reminders, follow ups and set rules and tags based on their bookings.
To learn how to create automations visit our guide 'How to create automations in Flow'. Just select the calendar booking as the trigger and you can set actions such as:
- Send email (confirmation, prep materials, meeting link)
- Send SMS (reminder closer to appointment)
- Add tag (e.g., "Scheduled Appointment" or "Coaching Client")
- Create task (for your team to prepare)
- Send SMS reminder at specific times (1 day before, 1 hour before)
Best Practices
- Clear Service Descriptions: Explain what happens during the appointment. Remove guesswork.
- Realistic Availability: Only show times you're truly available. Overbooking and cancelled appointments damage trust.
- Set Minimums: Require advance notice or minimum booking windows so you have prep time.
- Use Buffers: Build in time between appointments for notes, breaks, and transitions.
- Automate Reminders: Send reminders 24 hours and 1 hour before. These reduce no-shows dramatically.
- Collect Prep Information: Ask relevant questions before the appointment (via form or custom field). Use this to prepare.
- Integrate with Your Calendar: Sync your Flow calendar with Google Calendar or Outlook so double-bookings can't happen.
- Send Meeting Links: For video calls, include the meeting link in your confirmation and reminder emails so customers have it ready.
- Track No-Shows: Tag no-shows and follow up. Some can be rebooked; chronic no-shows may need deposits.
- Get Feedback: After each appointment, send a quick survey or ask: "How was your experience?" Use feedback to improve.
Common Mistakes to Avoid
- Not Syncing Calendars: Your Flow calendar, Google Calendar, and Outlook all un-synced leads to double-bookings.
- Showing Too Many Slots: Showing availability 90 days out overwhelms customers. Stick to 14-30 days.
- No Buffer Time: Back-to-back appointments with no breathing room burns you out. Always include buffer between slots.
- Skipping Reminders: Without automated reminders, no-shows spike to 20-30%. With reminders, you'll drop to 5-10%.
- Confusing Service Names: "Package 1" doesn't tell customers anything. Be specific: "60-Minute Strategy Session" is clear.
- Unclear Pricing: Hidden fees or surprise costs at checkout frustrate customers. Show total price upfront.
- Not Following Up: Booking confirmed, then silence until appointment. Send prep materials. Send reminders. Send follow-up. Engagement matters.
- Accepting Payment Too Late: Taking payment after a consultation is risky (people leave, refund requests happen). Require payment at booking.
- Ignoring No-Shows: Some customers book but don't show. Track them. Follow up. Consider a cancellation policy.
Booking calendars transform how service-based businesses operate. Instead of juggling emails and scheduling conflicts, your calendar is your system. Customers book instantly. Reminders go out automatically. Follow-ups are triggered. Your time is protected and your customer experience is seamless.
Start simple: one service, clear availability, basic automations. Test it with a few bookings. Then layer in more services, add-ons, and automations as you grow.
The businesses that win are the ones that respect time - theirs and their customers'. A booking calendar is how you do that at scale.