
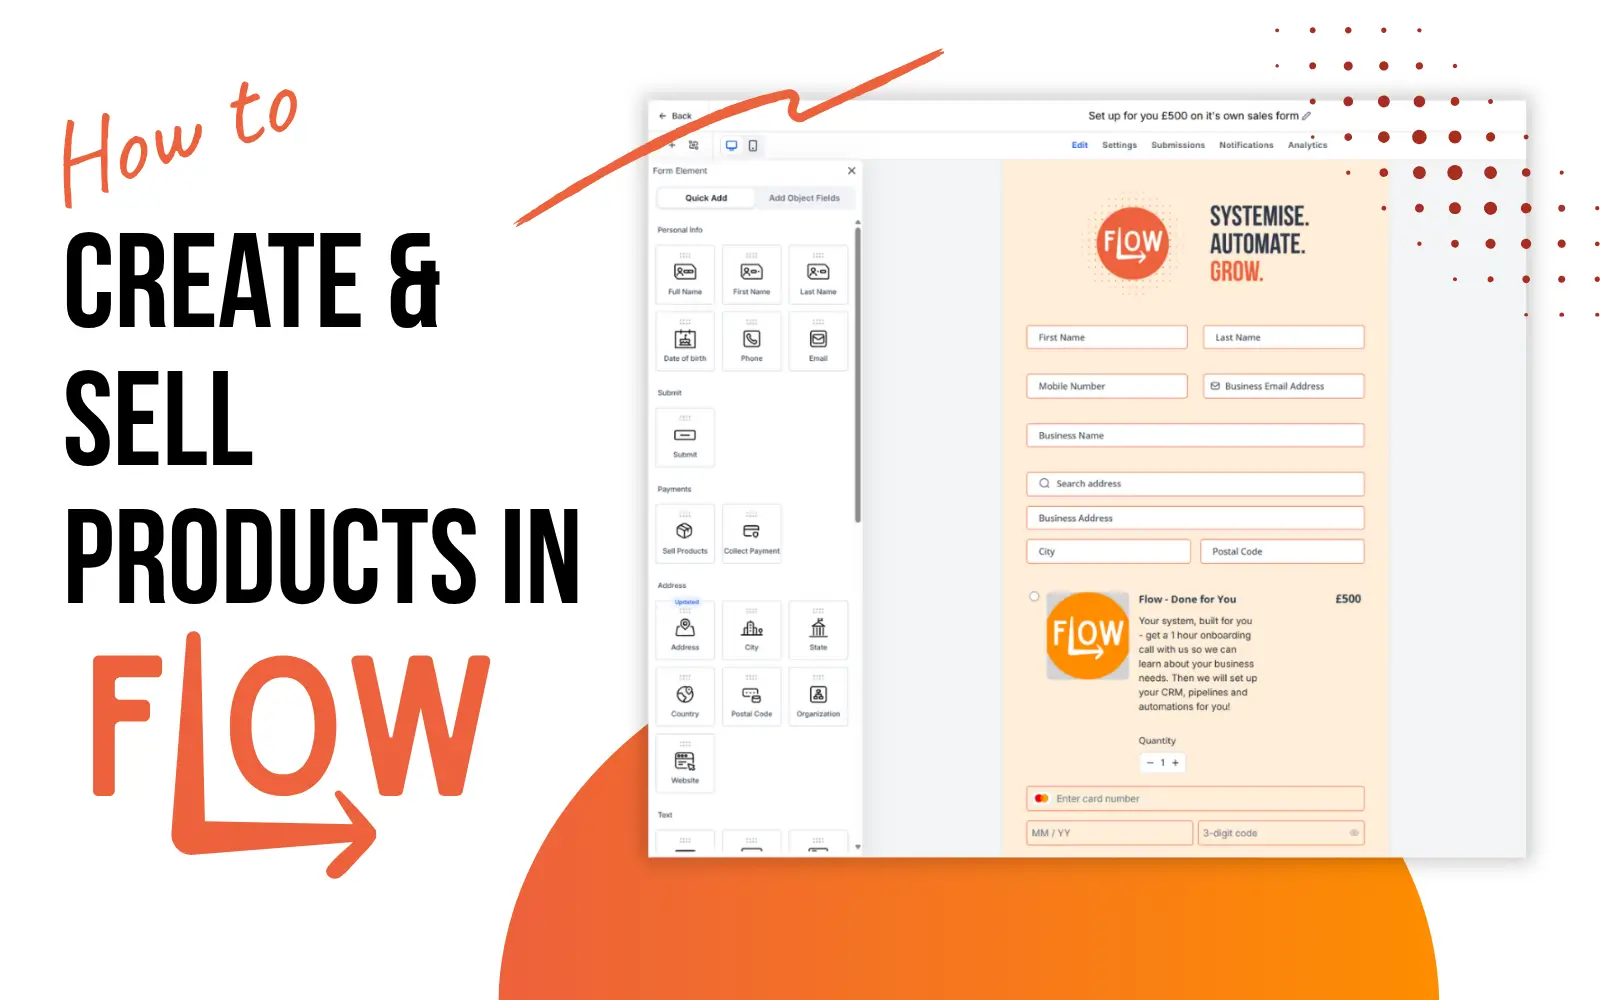
How to create & Sell Products in Flow
📖 15 minute read
Flow isn't just for CRMs and automations. It's a complete sales platform where you can create products, set pricing, offer discounts, and sell directly to your audience. Whether you're selling digital products, physical goods, courses, memberships, or services, Flow handles the entire transaction in one place. No need to juggle separate payment processors, spreadsheets, or accounting systems.
Remember, you will need to have connected a payment method such as Stripe to collect payments for products through Flow. To do this follow the instructions in the What to do first in Flow guide.
Why Sell Products in Flow?
Most businesses use multiple tools to sell products & services: forms capture leads, email software sends campaigns, payment processors handle transactions, and spreadsheets track sales. Flow brings it all together.
When you sell products in Flow, you get:
- Unified payments: Accept payments directly without leaving Flow. All transactions in one dashboard.
- Automatic contact creation: Every purchase creates or updates a contact. No manual data entry.
- Inventory tracking: Know how many units you have and when to reorder.
- Coupon automation: Create discount codes that work across all sales channels.
- Reporting and analytics: See revenue, average order value, top products, and customer lifetime value.
- Post-purchase automations: Trigger delivery, follow-ups, upsells, or support workflows automatically.
- Multiple sales channels: Sell the same product through forms, email, SMS, and landing pages without setting up each separately.
- Customer history: Every purchase appears on the customer's contact record, building a complete sales history.
Types of Products You Can Sell
Digital Products
- Courses and training modules
- eBooks and guides
- Templates and resources
- Software licenses
- Memberships
Physical Products
- Physical goods
- Merchandise
- Books and printed materials
- Hardware
- Subscriptions (if physical items ship regularly)
Services
- Consulting packages
- Coaching sessions
- Done-for-you services
- Service retainers
- Workshop attendance
Recurring Revenue
- Monthly subscriptions
- Annual memberships
- Quarterly billing
- Subscription tiers
- Payment plans
Creating a Product
Step 1: Navigate to Products & create a new product
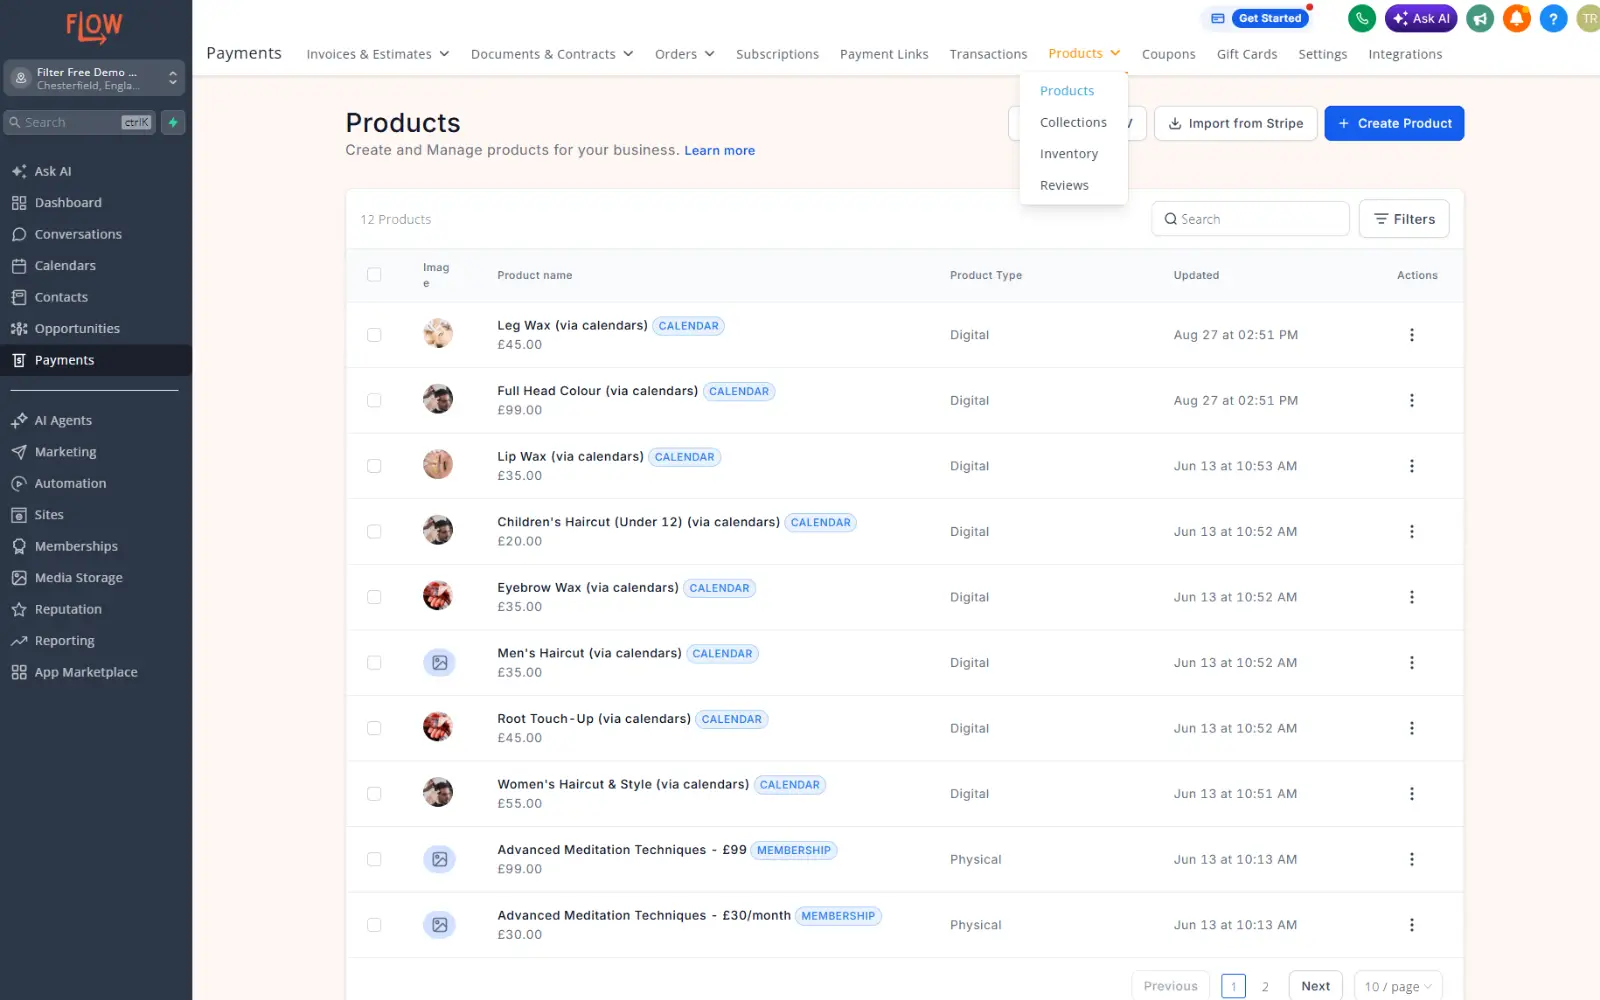
In your Flow dashboard, navigate to Payments → Products. Here you can view all of your products that have been created.
Click Create Product in the top right. This opens the product creation form.
Step 2: Fill in Basic Information
You'll need:
- Product name: What you call it (e.g., "1 Hour Massage", "My SEO Guide")
- Description: What it is and what problems it solves
- Category: Group products by type (e.g., "Services", "Digital Guides")
- Product image: A photo or illustration (helps with trust and marketing)
Step 3: Set Up Pricing
Enter your pricing. You can select a one-time payment or a recurring subscription, set billing and trial periods and even have multiple variants.
💡 Pro Tip: Offer multiple versions of the same product at different price points with tiered pricing
Tiered Pricing Example
- Starter: £49 (video consultation only)
- Professional: £99 (video consultation + templates + email support)
- Elite: £199 (in-person consultation + templates + email support + monthly coaching call)
Customers choose their tier at purchase. Each tier can have different content, features, or support levels.
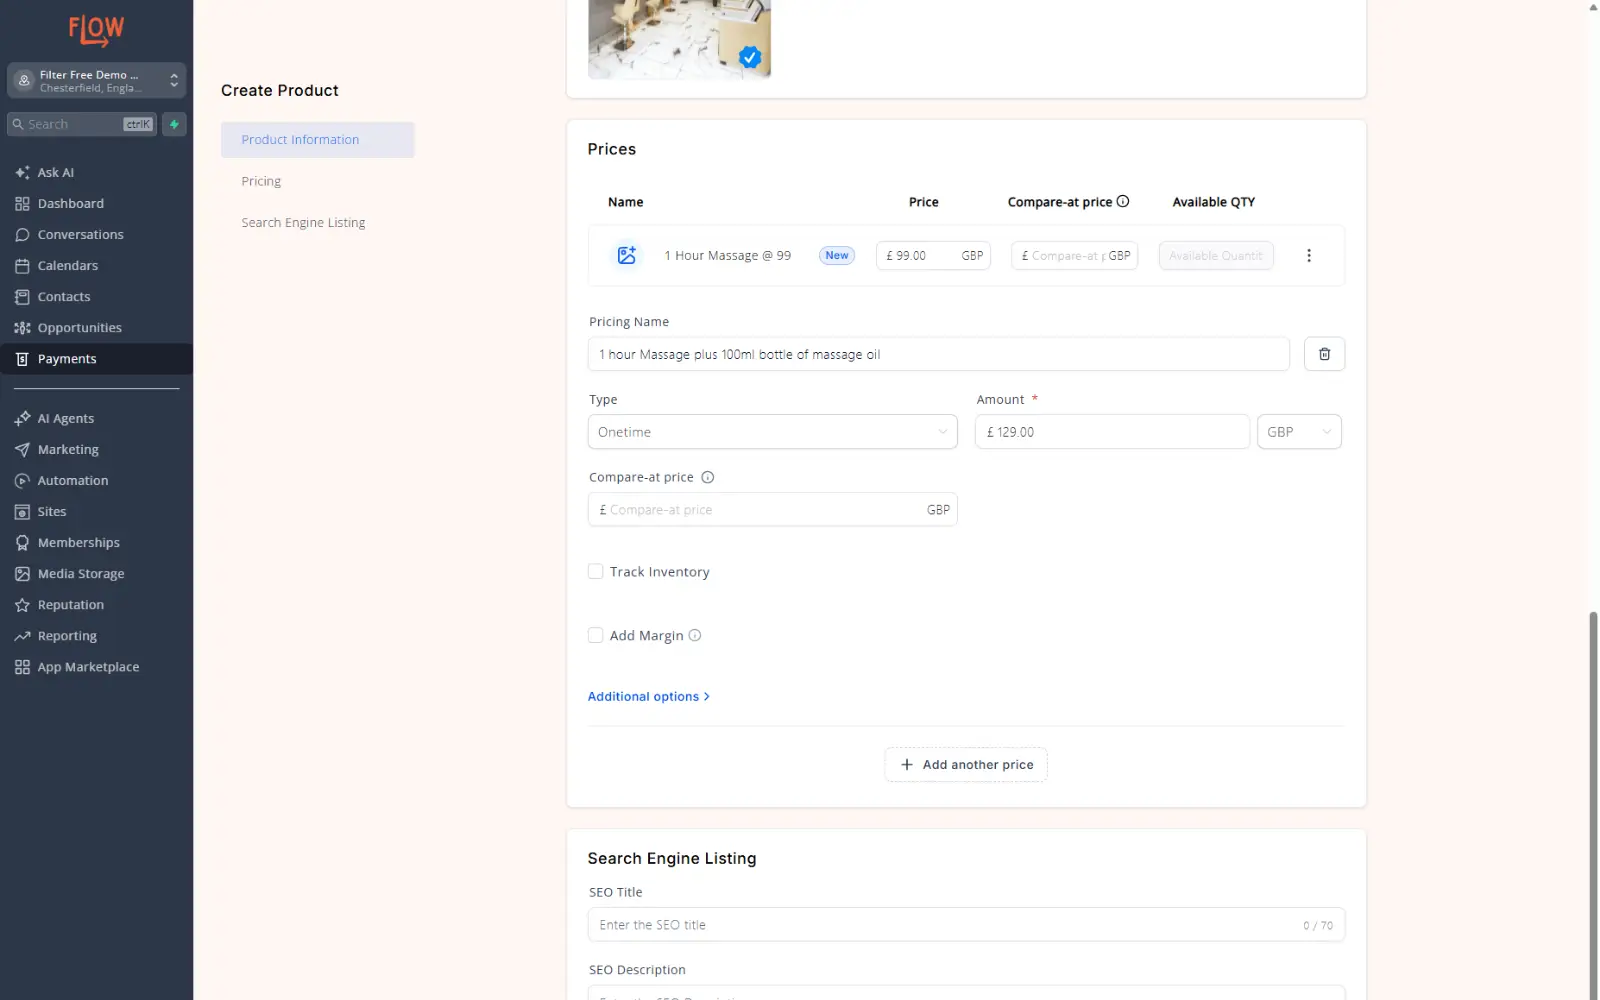
Step 4: Configure Inventory (if applicable)
If you're selling physical products or have limited quantities:
- Tick track inventory
- Enter the quantity you have in stock
- Flow will automatically track units sold until you are at 0 stock.
Digital products usually don't need inventory tracking because they're unlimited.
Step 5: Add Product Details and Delivery
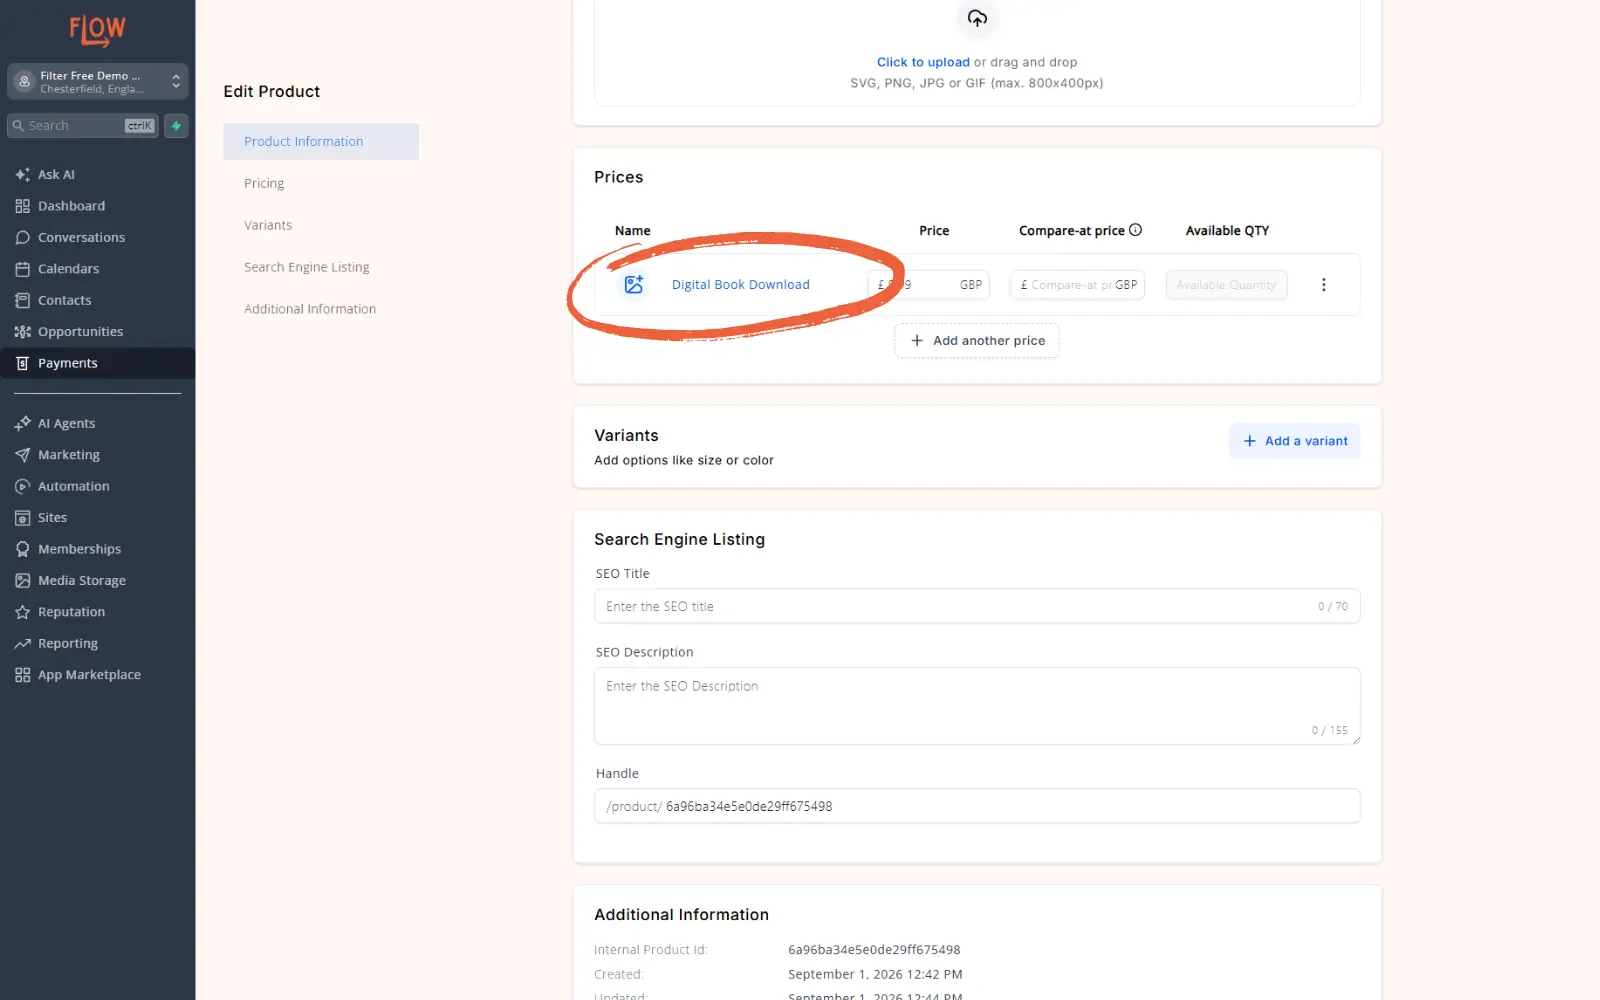
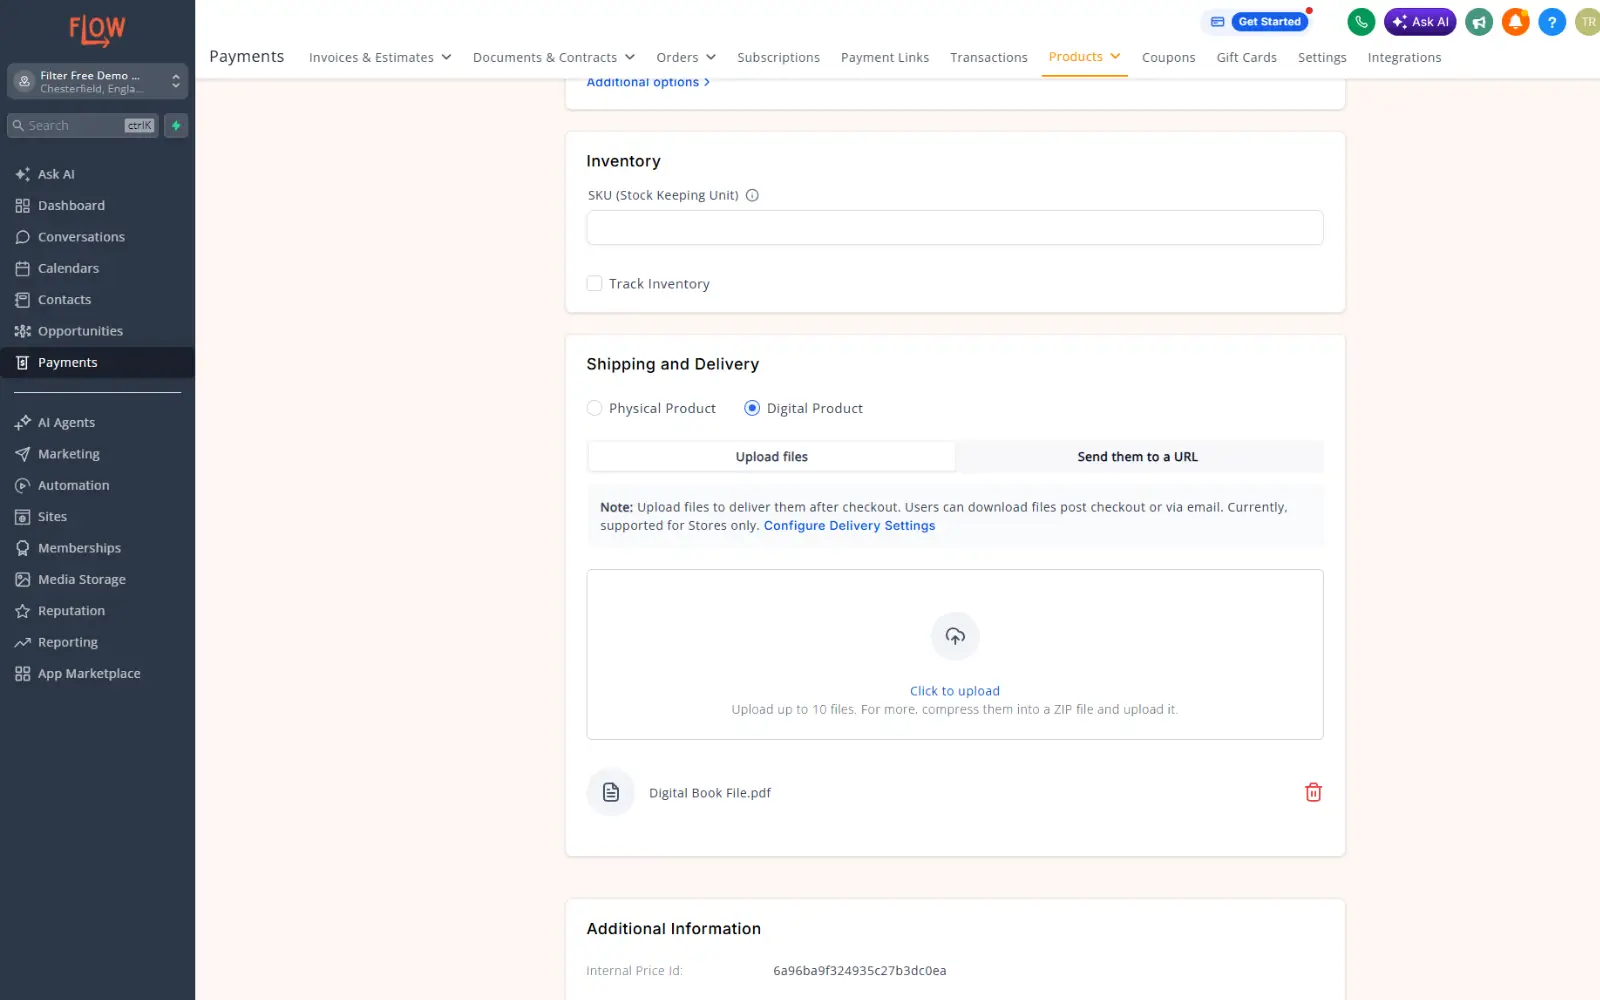
Once you have saved your pricing, by clicking on the pricing option you have set up within the product (the name of the pricing option you set in blue text) you can add additional details to help with fulfilment.
- Digital products: Upload files or link to where customers access the product.
- Physical products: Set weight and dimensions (for shipping calculations)
Step 6: Save the Product
Save the product at the top of the screen to set it live.
Selling through Forms
Once you have created and published your product, you need a way to sell it. The most common way to do this is by creating a form which acts as a checkout for your customer.
💡 Pro Tip: We strongly recommend completing the lesson How to create Forms and Surveys in Flow first to learn the basics on creating forms.
Step 1: Create a form for your product
Go to Sites - Forms to create a new or edit an existing form.
Step 2: Add a Products Field
Drag the form element 'Sell Products' under Payments into your form alonside your other fields e.g. Name, email etc.
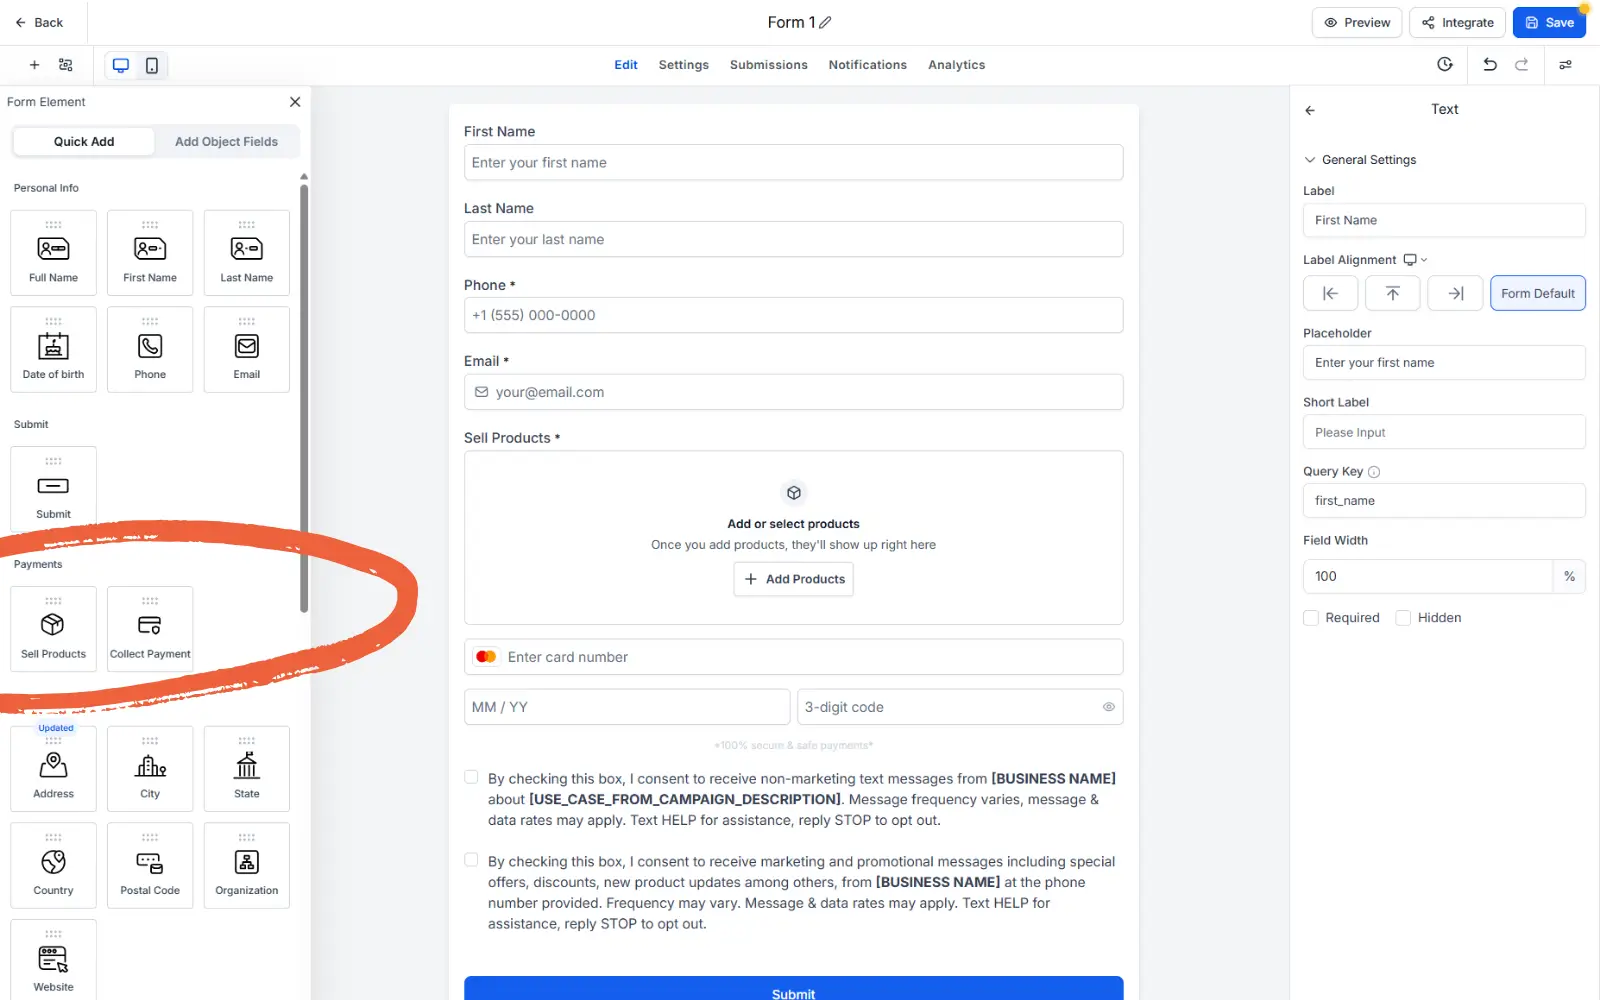
Click the Add Products button and select the product you created earlier from the dropdown on the right. Click Add Product at the bottom of the screen to finish adding it to the form.
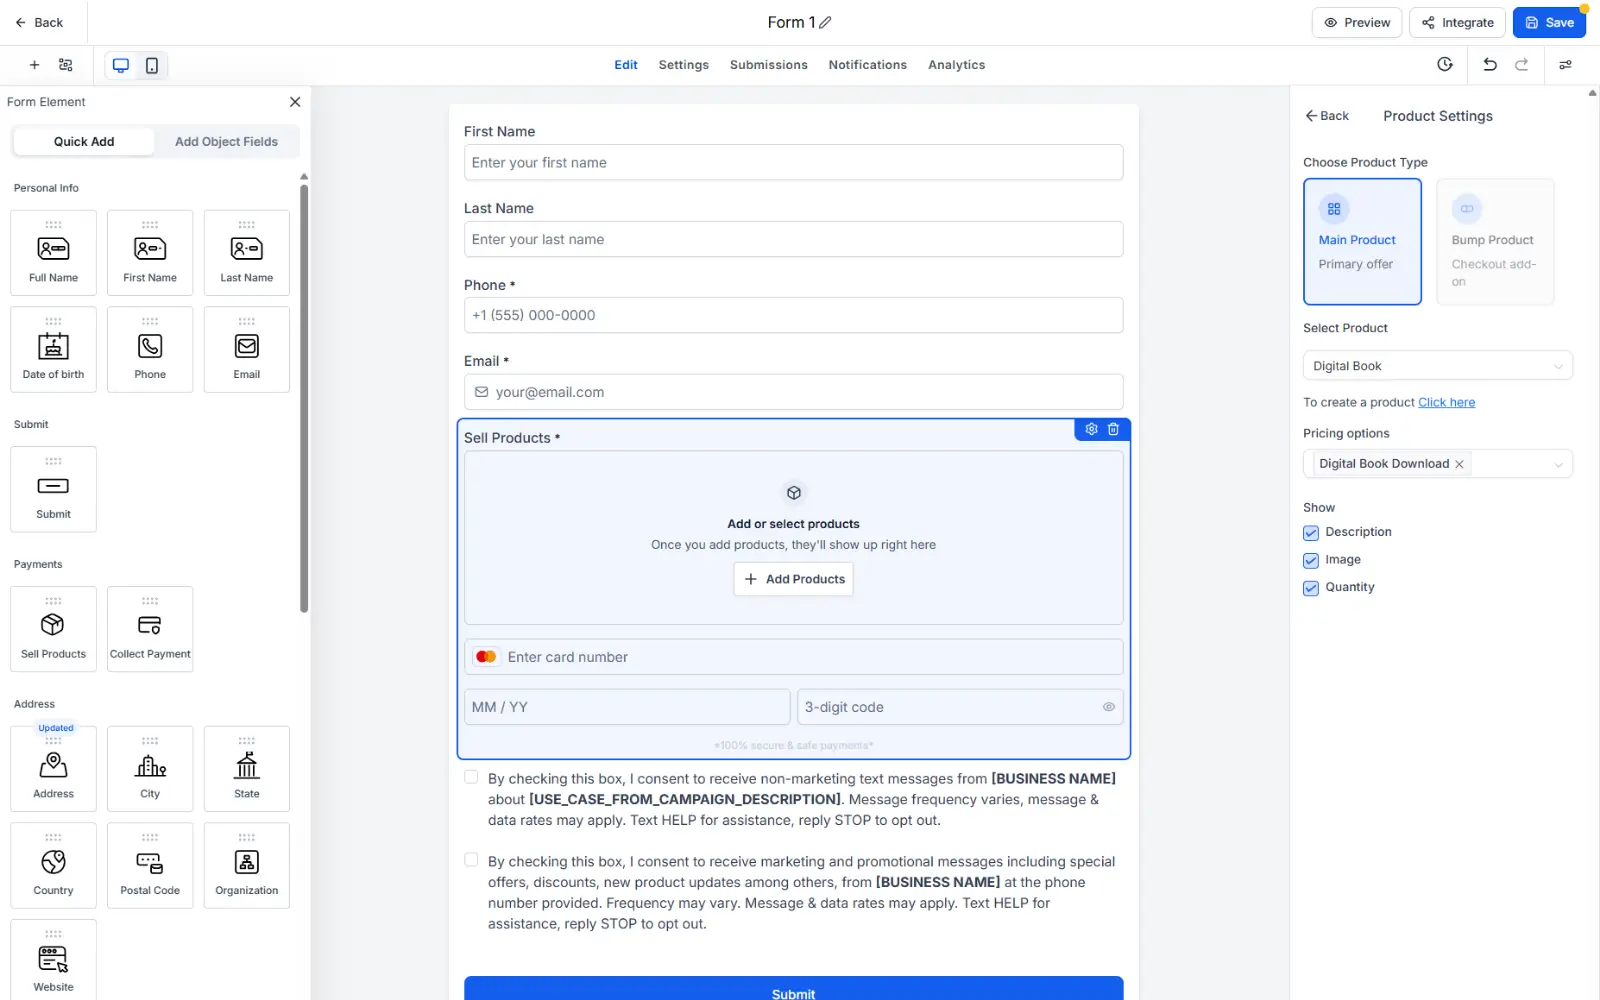
💡 Pro Tip: Add more than 1 product to your sell products field and make one a Bump Offer as an optional add on
Step 3: Configure Post-Purchase Actions
This is where Flow really shines. After someone buys, you can trigger automations:
- Send access email: Email with download link, login credentials, or course access
- Tag the customer: Add tags like "Customer" or "Course Purchaser"
- Send SMS notification: Notify customer their purchase was received
- Create a task: Task for your team to follow up or prepare delivery
- Start an automation: Trigger onboarding, upsell, or delivery workflows
💡 Pro Tip: Visit our lesson How to create automations in Flow to learn how to create automations such as these.
Use the trigger Order Submitted with filters to choose the product you want to automate the next steps for.
Step 4: Publish and Share
Publish the form and share the link. When customers fill it out and check out, they're automatically added to your CRM as contacts with purchase records attached.
Remember, you can use this form link in an email, on social media, or embed it directly into a calendar, funnel or website, all within the Flow business system.
Selling Through a Calendar
Sell services by letting customers book appointments directly from your calendar. When they book, they pay at the same time. Perfect for consulting, coaching, strategy sessions, demos, or any time-based service.
For full instructions on setting up a calendar for the first time we would recommend first reading our lesson on How to create booking calendars in Flow.
Option 1 - Set up a payment directly in the calendar
Go to Settings - Calendars and create a new calendar or edit an existing one.
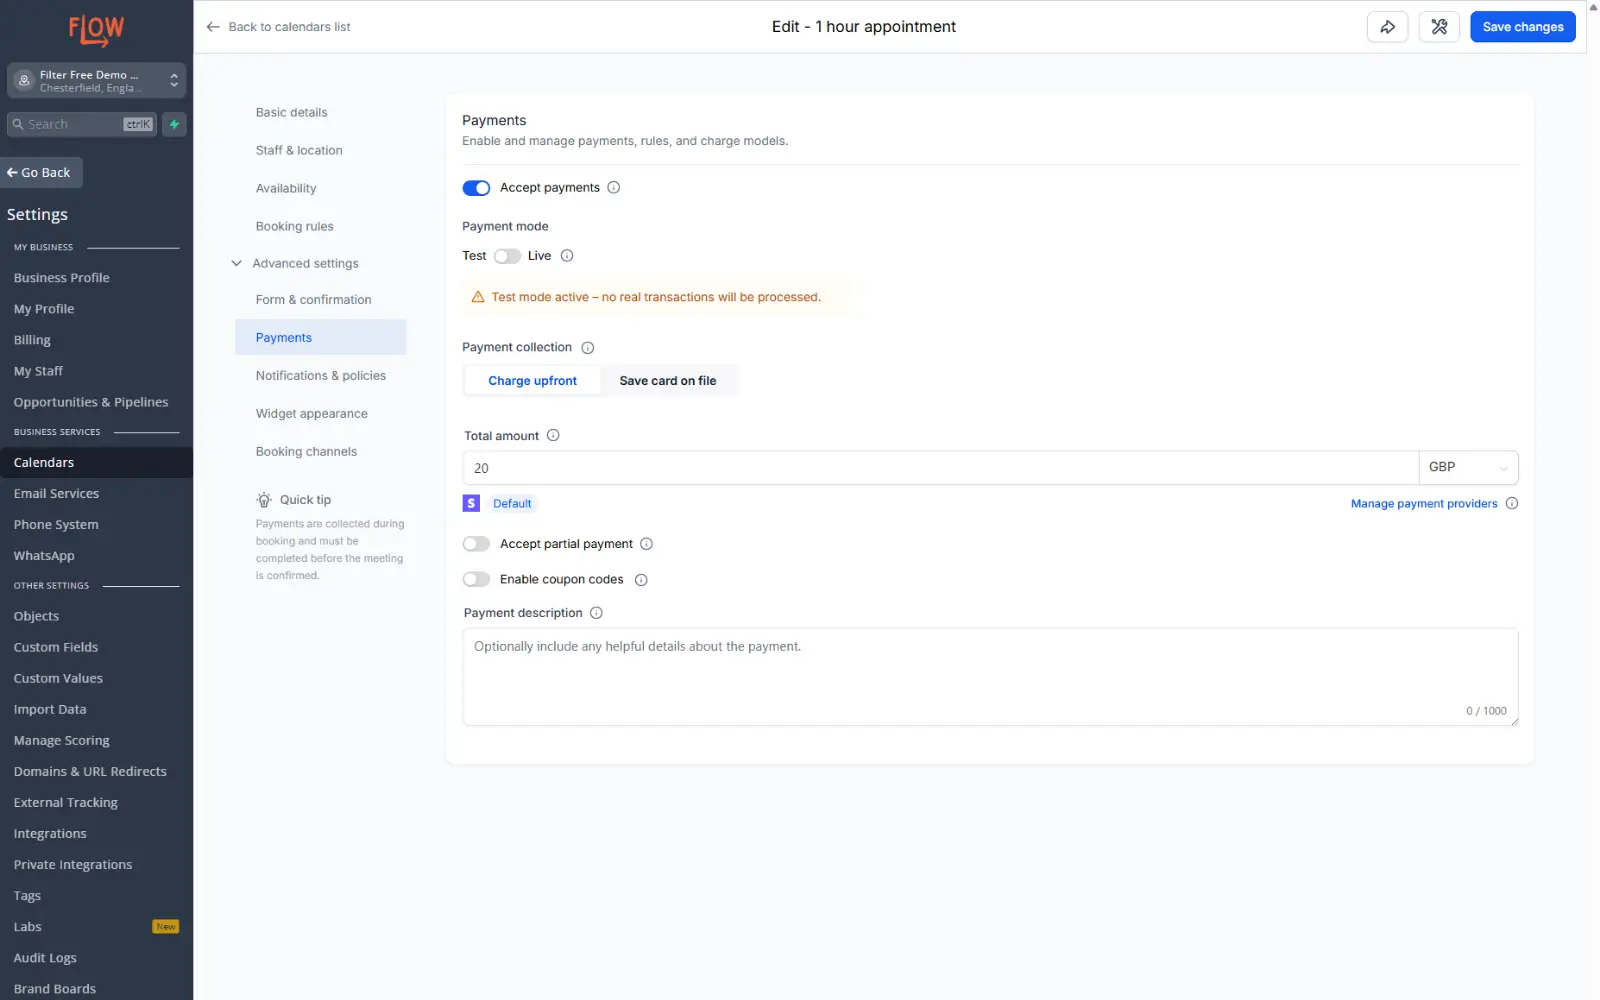
In the advanced settings here you can turn on Accept Payment, and customise the charge for the booking. Remember to set the currency to GBP if you want to take payments in UK £.
Continue setting up your calendar as normal before saving & sharing the link. It will now include a checkout screen on the booking form.
Option 2 - Add your calendar to your form
Go to Settings - Calendars and create a new calendar or edit an existing one. As with above, turn on Accept Payment and customise the charge before saving.
Go back to forms and add a new product here, you can now select the calendar booking product that you just created.
Coupons and Discount Codes
Coupons let customers enter a code to receive a discount. They work across all sales channels: forms, email, SMS, landing pages, funnels.
Creating a Coupon
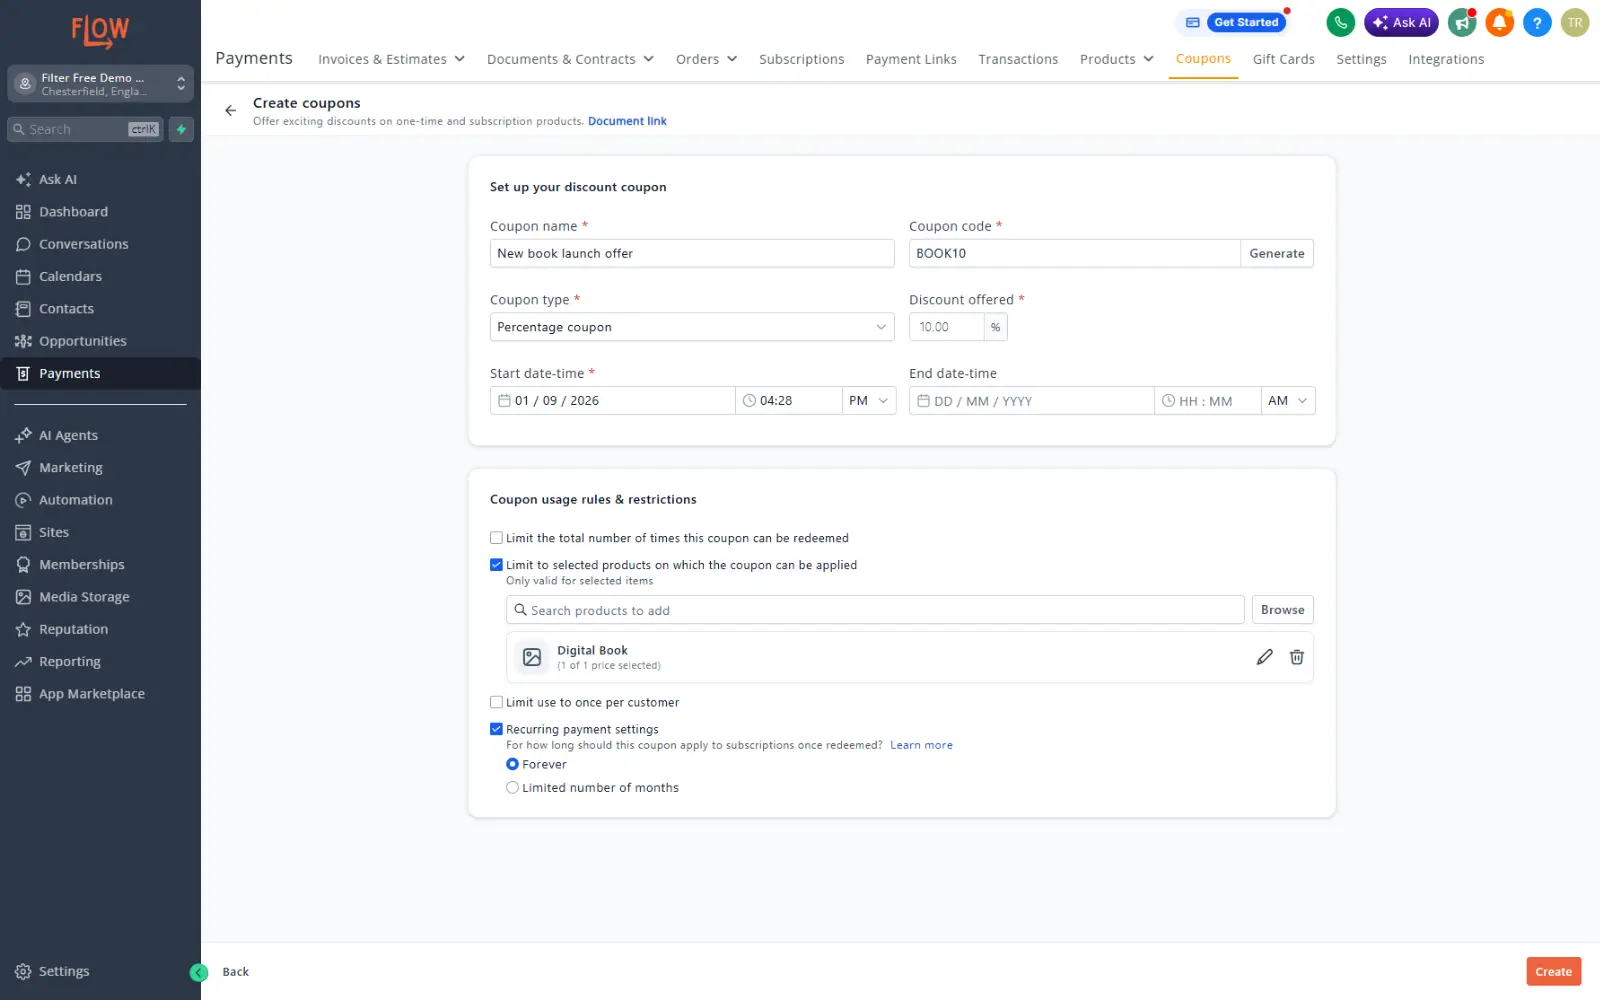
Go to Payments - Coupons and click Create Coupon.
On the coupon screen enter the following details:
- Coupon Name - For your own records
- Coupon Code - What coupon code do you want customers to use
- Coupon Type - Give a % discount or a fixed amount off
- Dates - Set a time that your coupon will run for or leave the end date blank to run it forever (until you turn it off)
- Coupon usage rules - Set the number of times the coupon can be used, and link it to specific products.
💡 Pro Tip: Make sure you link the coupon to a product you want it to be used on. Otherwise it will apply for any products you create.
Once the coupon is created you must enable coupons back on either your form or calendar settings to allow a coupon code entry field to appear for customers.
Best Practices
- Clear Product Descriptions: Tell customers exactly what they're getting. If it's a massage, what type and for how long? If it's for a product, what exactly will they receive? Remove ambiguity.
- Set Expectations on Delivery: When will they get access? Same day? 24 hours? Let them know upfront to avoid support queries.
- Use Post-Purchase Automations: Don't just take money and disappear. Send access, welcome emails, and onboarding automatically by using automations to ensure customer success.
- Price Strategically: Too cheap undervalues your work and leaves money on the table. Too expensive and nobody buys. Test and iterate.
- Bundle and Tier: Offer multiple price points (but not too many). Let budget-conscious buyers get value. Let high-ticket buyers get premium experience.
- Create Urgency Around Offers: Limited-time offers and countdown timers drive action. Use them, but be honest. Don't claim "last chance" forever.
- Track What Sells: Review sales reports to see which products are winners and which aren't. Double down on what works.
- Segment Customers: Tag customers by what they bought. Use tags to send relevant follow-ups (e.g., course buyers get course support emails; template buyers get template updates).
Common Mistakes to Avoid
- No Clear Delivery Instructions: Customer buys but doesn't know what to do next. Set up automated delivery emails so they get access immediately.
- Overcomplicating Pricing: Five different tiers, multiple options, payment plans, and offers confuse customers. Simplify. Just a couple of clear options work better.
- Setting Price Too Low: Underpricing feels safe but trains customers to expect cheap products and makes revenue targets impossible to hit.
- Not Using Coupons Strategically: Running constant 50% discounts trains customers to never pay full price. Reserve big discounts for launch, seasonal sales, or special partnerships.
- Forgetting Post-Purchase Experience: Capture the sale, then ghost the customer. Use automations to deliver, onboard, and upsell. Happy customers buy again.
- No Inventory Management: Overselling physical products leads to backorders, refunds, and angry customers. Track inventory carefully.
- Creating Too Many Products: Every new product fragments your focus. Start with 2-3 core offerings. Master them before adding more.
- Ignoring Sales Data: Many sellers don't review their sales reports. You're missing insights about what works, peak seasons, and revenue trends.
- Not Testing Checkout: Technical problems at checkout kill sales. Always test the full purchase flow before launching.
Turn Flow Into Your Complete Sales Engine
Flow's product system is designed for businesses that want to sell without complexity. Create a product once. Sell it through multiple channels. Let automations handle follow-up. Watch revenue grow.
Start simple: one product, simple pricing, strong product description. Get that working. Then layer in offers, coupons, payment plans, and new products. The key is getting your first sale, learning from it, and improving.
Every customer who buys is added to your CRM. Every purchase is tracked. Every interaction can trigger automated follow-ups. This is how you scale: not by working harder, but by letting Flow work for you.